
In this tutorial, you will learn how to use Auto-Keras, an open source alternative to Google’s AutoML, for automated machine learning and deep learning.
When training a neural network on a dataset there are two primary objectives a deep learning practitioner is trying to optimize and balance:
-
Defining a neural network architecture that lends itself to the nature of the dataset
-
Tuning a set of hyperparameters over many experiments that will lead to a model with high accuracy and ability to generalize to data outside the training and testing sets. Typical hyperparameters that need to be tuned include the optimizer algorithm (SGD, Adam, etc.), learning rate and learning rate scheduling, and regularization, to name a few
Depending on the dataset and problem, it can take a deep learning expert upwards of tens to hundreds of experiments to find a balance between neural network architecture and hyperparameters.
These experiments can add up to hundreds to thousands of hours in GPU compute time.
And that’s just for experts — what about non-deep learning experts?
Enter Auto-Keras and AutoML:
The end goal of both Auto-Keras and AutoML is to reduce the barrier to entry to performing machine learning and deep learning through the use of automated Neural Architecture Search (NAS) algorithms.
Auto-Keras and AutoML enable non-deep learning experts to train their own models with minimal domain knowledge of either deep learning or their actual data.
Using AutoML and Auto-Keras, a programmer with minimal machine learning expertise can apply these algorithms to achieve state-of-the-art performance with very little effort.
Sound too good to be true?
Well, maybe — but you’ll need to read the rest of the post first to find out why.
To learn more about AutoML (and how to automatically train and tune a neural network with Auto-Keras), just keep reading!
Auto-Keras and AutoML: A Getting Started Guide
In the first part of this blog post, we’ll discuss Automated Machine Learning (AutoML) and Neural Architecture Search (NAS), the algorithm that makes AutoML possible when applied to neural networks and deep learning.
We’ll also briefly discuss Google’s AutoML, a suite of tools and libraries allowing programmers with limited machine learning expertise to train high accuracy models on their own data.
Of course, Google’s AutoML is a proprietary algorithm (it’s a bit on the expensive side of as well).
An alternative to AutoML is the open source Auto-Keras, built around Keras and PyTorch.
I’ll then show you how to automatically train a network using Auto-Keras as well as to evaluate it.
What is Automated Machine Learning (AutoML)?
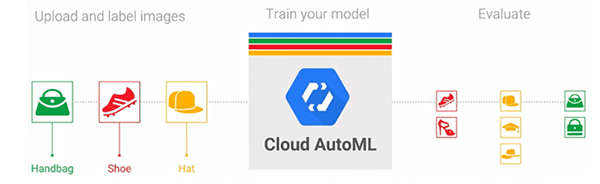
Figure 1: Auto-Keras is an alternative to Google’s AutoML. These software projects can help you train models automatically with little intervention. They are great options for novice deep learning practitioners or to obtain a baseline to beat later on.
Outside of unsupervised learning (automatically learning patterns from unlabeled data), automated machine learning for non-experts is considered the “holy grail” of machine learning.
Imagine the ability to automatically create a machine learning model via:
-
Installing a library/using a web interface
-
Pointing the library/interface to your data
-
Automatically training a model on the data without having to tune the parameters/requiring an intimate understanding of the algorithms powering it
Some companies are trying to create such solutions — a big one is Google’s AutoML.
Google AutoML enables developers and engineers with very limited machine learning experience to automatically train neural networks on their own datasets.
Under the hood Google’s AutoML algorithms are iterative:
-
Training a network on a training set
-
Evaluating the network on a testing set
-
Modifying the neural network architecture
-
Tuning hyperparameters
-
Repeating the process
The programmer or engineer using AutoML doesn’t need to define their own neural network architecture or tune the hyperparameters — AutoML is doing that for them automatically.
Neural Architecture Search (NAS) makes AutoML possible
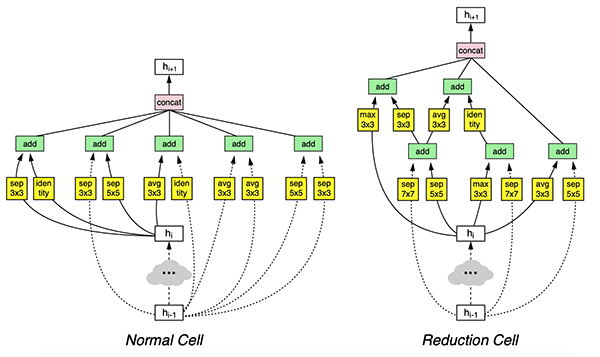
Figure 2: Neural Architecture Search (NAS) produced a model summarized by these graphs when searching for the best CNN architecture for CIFAR-10 (source: Figure 4 of Zoph et al.)
Both Google’s AutoML and Auto-Keras are powered by an algorithm called Neural Architecture Search (NAS).
Given your input dataset, a Neural Architecture Search algorithm will automatically search for the most optimal architecture and corresponding parameters.
Neural Architecture Search essentially replaces the deep learning engineer/practitioner with a set of algorithms that automatically tunes the model!
In the context of computer vision and image recognition, a Neural Architecture Search algorithm will:
-
Accept an input training dataset
-
Optimize and find architectural building blocks called “cells” — these cells are automatically learned and may look similar to inception, residual, or squeeze/fire micro-architectures
-
Continually train and search the “NAS search space” for more optimized cells
If the user of the AutoML system is an experienced deep learning practitioner then they may decide to:
-
Run the NAS on a significantly smaller subset of the training dataset
-
Find an optimal set of architectural building blocks/cells
-
Take these cells and manually define a deeper version of the network found during the architecture search
-
Train the network on the full training set using their own expertise and best practices
Such an approach is a hybrid between a fully automated machine learning solution and one that requires an expert deep learning practitioner — often this approach will lead to better accuracy than what the NAS finds on its own.
I would recommend reading Neural Architecture Search with Reinforcement Learning (Zoph and Le, 2016) along with Learning Transferable Architectures for Scalable Image Recognition (Zoph et al., 2017) for more details on how these algorithms work.
Auto-Keras: An open source alternative to Google’s AutoML
![]()
Figure 3: The Auto-Keras package was developed by the DATA Lab team at Texas A&M University. Auto-Keras is an open source alternative to Google’s AutoML.
The Auto-Keras package, developed by the DATA Lab team at Texas A&M University, is an alternative to Google’s AutoML.
Auto-Keras also utilizes the Neural Architecture Search but applies “network morphism” (keeping network functionality while changing the architecture) along with Bayesian optimization to guide the network morphism for more efficient neural network search.
You can find the full details of the Auto-Keras framework in Jin et al.’s 2018 publication, Auto-Keras: Efficient Neural Architecture Search with Network Morphism.
Project structure
Go ahead and grab the zip from the “Downloads” section of today’s blog post.
From there you should unzip the file and navigate into it using your terminal.
Let’s inspect today’s project with the tree command:
| $ tree –dirsfirst.├── output│ ├── 14400.txt│ ├── 28800.txt│ ├── 3600.txt│ ├── 43200.txt│ ├── 7200.txt│ └── 86400.txt└── train_auto_keras.py 1 directory, 7 files |
.
│ ├── 14400.txt
│ ├── 3600.txt
│ ├── 7200.txt
└── train_auto_keras.py
1 directory, 7 files
Today we’re going to be reviewing a single Python script: train_auto_keras.py .
Since there will be a lot of output printed to the screen, I’ve opted to save our classification reports (generated with the help of scikit-learn’s classification_report tool) as text files to disk. Inspecting the output/ folder above you can see a handful of the reports that have been generated. Go ahead and print one to your terminal ( cat output/14400.txt ) to see what it looks like.
Installing Auto-Keras
Figure 4: The Auto-Keras package depends upon Python 3.6, TensorFlow, and Keras.
As the Auto-Keras GitHub repository states, Auto-Keras is in a “pre-release” state — it is not an official release.
Secondly, Auto-Keras requires Python 3.6 and is only compatible with Python 3.6.
If you are using any other version of Python other than 3.6 you will not be able to utilize the Auto-Keras package.
To check your Python version just use the following command:
Provided you have Python 3.6 you can install Auto-Keras using pip:
| $ pip install tensorflow # or tensorflow-gpu$ pip install keras$ pip install autokeras |
$ pip install keras
If you have any issues installing or utilizing Auto-Keras make sure you post on the official Auto-Keras GitHub Issues page where the authors will be able to help you.
Implementing our training script with Auto-Keras
Let’s go ahead and implement our training script using Auto-Keras. Open up the train_auto_keras.py file and insert the following code:
| # import the necessary packagesfrom sklearn.metrics import classification_reportfrom keras.datasets import cifar10import autokeras as akimport os def main(): # initialize the output directory OUTPUT_PATH = “output” |
from sklearn.metrics import classification_report
import autokeras as ak
# initialize the output directory
To begin, we import necessary packages on Lines 2-5:
As previously mentioned, we’ll be using scikit-learn’s classification_report to calculate statistics which we’ll save in our output files. We’re going to use the CIFAR-10 Dataset, conveniently built into keras.datasets . Then comes our most notable import, autokeras , which I’ve imported as ak for shorthand. The os module is required as we’ll accommodate path separators on various operating systems when building output file paths.
Let’s define the main function for our script on Line 7. We’re required to wrap our code in a main function due to how Auto-Keras and TensorFlow handle threading. See this GitHub issue thread for more details.
Our base OUTPUT_PATH is defined on Line 9.
Now let’s initialize a list of training times for Auto-Keras:
| # initialize the list of training times that we’ll allow # Auto-Keras to train for TRAINING_TIMES = [ 60 * 60, # 1 hour 60 * 60 * 2, # 2 hours 60 * 60 * 4, # 4 hours 60 * 60 * 8, # 8 hours 60 * 60 * 12, # 12 hours 60 * 60 * 24, # 24 hours ] |
# Auto-Keras to train for
60 * 60, # 1 hour
60 * 60 * 4, # 4 hours
60 * 60 * 12, # 12 hours
]
Lines 13-20 define a set of TRAINING_TIMES , including [1, 2, 4, 8, 12, 24] hours. We’ll be exploring the effect of longer training times on accuracy using Auto-Keras today.
Let’s load the CIFAR-10 dataset and initialize class names:
| # load the training and testing data, then scale it into the # range [0, 1] print(“[INFO] loading CIFAR-10 data…”) ((trainX, trainY), (testX, testY)) = cifar10.load_data() trainX = trainX.astype(“float”) / 255.0 testX = testX.astype(“float”) / 255.0 # initialize the label names for the CIFAR-10 dataset labelNames = [“airplane”, “automobile”, “bird”, “cat”, “deer”, “dog”, “frog”, “horse”, “ship”, “truck”] |
# range [0, 1]
((trainX, trainY), (testX, testY)) = cifar10.load_data()
testX = testX.astype(“float”) / 255.0
# initialize the label names for the CIFAR-10 dataset
“dog”, “frog”, “horse”, “ship”, “truck”]
Our CIFAR-10 data is loaded and stored into training/testing splits on Line 25.
Subsequently, we’ll scale this data to the range of [0, 1] (Lines 26 and 27).
Our class labelNames are initialized on Lines 30 and 31. These 10 classes are included in CIFAR-10. Take note that order is important here.
And now let’s begin looping over our TRAINING_TIMES , each time putting Auto-Keras to use:
| 33343536373839404142434445464748495051525354 | # loop over the number of seconds to allow the current Auto-Keras # model to train for for seconds in TRAINING_TIMES: # train our Auto-Keras model print(“[INFO] training model for {} seconds max…“.format( seconds)) model = ak.ImageClassifier(verbose=True) model.fit(trainX, trainY, time_limit=seconds) model.final_fit(trainX, trainY, testX, testY, retrain=True) # evaluate the Auto-Keras model score = model.evaluate(testX, testY) predictions = model.predict(testX) report = classification_report(testY, predictions, target_names=labelNames) # write the report to disk p = os.path.sep.join(OUTPUT_PATH, “{}.txt”.format(seconds)) f = open(p, “w”) f.write(report) f.write(“\nscore: {}”.format(score)) f.close() |
34
36
38
40
42
44
46
48
50
52
54
# model to train for
# train our Auto-Keras model
seconds))
model.fit(trainX, trainY, time_limit=seconds)
score = model.evaluate(testX, testY)
report = classification_report(testY, predictions,
p = os.path.sep.join(OUTPUT_PATH, “{}.txt”.format(seconds))
f.write(report)
f.close()
The code block above is the heart of today’s script. On Line 35 we’ve defined a loop over each of our TRAINING_TIMES , where we:
Initialize our model ( ak.ImageClassifier ) and allow training to start (Lines 39 and 40). Notice that we didn’t instantiate an object for a particular CNN class as we have in previous tutorials such as this one. Nor do we need to tune hyperparameters as we typically do. Auto-Keras handles all of this for us and provides a report of its findings. Once the time limit has been reached, take the best model and parameters Auto-Keras has found + re-train the model (Line 41). Evaluate and construct the classification report (Lines 44-47). Write the classification report along with the accuracy score to disk so we can evaluate the effect of longer training times (Lines 50-54).
We’ll repeat this process for each of our TRAINING_TIMES .
Finally, we’ll check for and start the main thread of execution:
| # if this is the main thread of execution then start the process (our# code must be wrapped like this to avoid threading issues with# TensorFlow)if name == “main”: main() |
code must be wrapped like this to avoid threading issues with
if name == “main”:
Here we’ve checked to ensure that this is the main thread of execution and then the main function.
Just 60 lines later, we’re done writing our Auto-Keras with CIFAR-10 example script. But we’re not done yet…
Training a neural network with Auto-Keras
Let’s go ahead and train our neural network using Auto-Keras.
Make sure you use the “Downloads” section of this tutorial to download the source code.
From there, open up a terminal, navigate to where you downloaded the source code, and execute the following command:
| 123456789101112131415161718192021222324252627282930313233343536373839404142434445464748495051525354555657585960616263646566676869707172737475 | $ python train_auto_keras.py[INFO] training model for 3600 seconds max… Preprocessing the images.Preprocessing finished. Initializing search.Initialization finished. +———————————————-+ | Training model 0 | +———————————————-+Using TensorFlow backend. No loss decrease after 5 epochs. Saving model.+————————————————————————–+ | Model ID | Loss | Metric Value | +————————————————————————–+ | 0 | 4.816269397735596 | 0.5852 | +————————————————————————–+ +———————————————-+ | Training model 1 | +———————————————-+Using TensorFlow backend.Epoch-14, Current Metric - 0.83: 28% | ██████▊ | 110/387 [01:02<02:46, 1.67 batch/s]Time is out.[INFO] training model for 86400 seconds max… Preprocessing the images.Preprocessing finished. Initializing search.Initialization finished. +———————————————-+ | Training model 0 | +———————————————-+Using TensorFlow backend. No loss decrease after 5 epochs….+———————————————-+ | Training model 21 | +———————————————-+Using TensorFlow backend. No loss decrease after 5 epochs. +————————————————————————–+ | Father Model ID | Added Operation | +————————————————————————–+ | to_deeper_model 16 ReLU | 16 | to_wider_model 16 64 | +————————————————————————–+ Saving model.+————————————————————————–+ | Model ID | Loss | Metric Value | +————————————————————————–+ | 21 | 0.8843476831912994 | 0.9316000000000001 | +————————————————————————–+ +———————————————-+ | Training model 22 | +———————————————-+Using TensorFlow backend.Epoch-3, Current Metric - 0.9: 80% | ████████████████████▊ | 310/387 [03:50<00:58, 1.31 batch/s]Time is out. No loss decrease after 30 epochs. |
2
4
6
8
10
12
14
16
18
20
22
24
26
28
30
32
34
36
38
40
42
44
46
48
50
52
54
56
58
60
62
64
66
68
70
72
74
[INFO] training model for 3600 seconds max…
Preprocessing finished.
Initializing search.
+———————————————-+
Saving model.
| Model ID | Loss | Metric Value |
| 0 | 4.816269397735596 | 0.5852 |
+———————————————-+
| Epoch-14, Current Metric - 0.83: 28% | ██████▊ | 110/387 [01:02<02:46, 1.67 batch/s]Time is out. |
Preprocessing the images.
Initialization finished.
| Training model 0 |
Using TensorFlow backend.
No loss decrease after 5 epochs.
+———————————————-+
+————————————————————————–+
| 16 | to_wider_model 16 64 |
+————————————————————————–+
| Training model 22 |
Using TensorFlow backend.
Here you can see that our script is instructing Auto-Keras to perform six sets of experiments.
The total training time, including the time limits + the time to re-fit the model, was a little over 3 dayson an NVIDIA K80 GPU.
Auto-Keras results
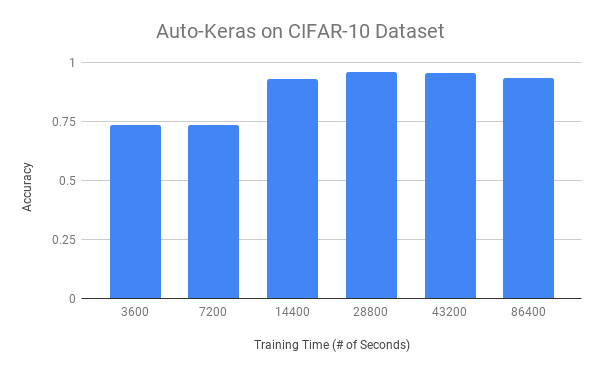
Figure 5: Using Auto-Keras usually is a very time-consuming process. Training with Auto-Keras produces the best models for CIFAR-10 in the 8-12 hour range. Past that, Auto-Keras is not able to optimize further.
In Figure 5 above you can see the effect of the amount of training time (x-axis) on overall accuracy (y-axis) using Auto-Keras.
Lower training times, namely 1 and 2 hours, lead to ~73% accuracy. Once we train for 4 hours we are able to achieve up to 93% accuracy.
The best accuracy we obtain is in the 8-12 range where we achieve 95% accuracy.
Training for longer than 8-12 hours does not increase our accuracy, implying that we have reached a saturation point and Auto-Keras is not able to optimize further.
Are Auto-Keras and AutoML worth it?

Figure 6: Is Auto-Keras (or AutoML) worth it? It is certainly a great step forward in the industry and is especially helpful for those without deep learning domain knowledge. That said, seasoned deep learning experts can craft architectures + train them in significantly less time + achieve equal or greater accuracy.
Outside of unsupervised learning (automatically learning patterns from unlabeled data), automated machine learning for non-experts is considered the “holy grail” of machine learning.
Both Google’s AutoML and the open source Auto-Keras package attempt to bring machine learning to the masses, even without significant technical experience.
While Auto-Keras worked reasonably well for CIFAR-10, I ran a second set of experiments using my previous post on deep learning, medical imagery, and malaria detection.
In that previous post, I obtained 97.1% accuracy using a simplified ResNet architecture which took under one hour to train.
I then let Auto-Keras run for 24 hours on the same dataset — the result was barely 96% accuracy, less than my hand-defined architecture.
Both Google’s AutoML and Auto-Keras are great steps forward; however, automated machine learning is nowhere near solved.
Automatic machine learning (currently) does not beat having expertise in deep learning — domain expertise, specifically in the data you are working with, is absolutely critical to obtain a higher accuracy model.
My suggestion is to invest in your own knowledge, don’t rely on automated algorithms.
To be a successful deep learning practitioner and engineer you need to bring the right tool to the job. Use AutoML and Auto-Keras for what they are, tools, and then continue to fill your own toolbox with additional knowledge.
Summary
In today’s blog post, we discussed Auto-Keras and AutoML, a set of tools and libraries to perform automated machine learning and deep learning.
The end goal of both Auto-Keras and AutoML is to reduce the barrier to entry to performing machine learning and deep learning through the use of Neural Architecture Search (NAS) algorithms.
NAS algorithms, the backbone of Auto-Keras and AutoML, will automatically:
-
Define and optimize a neural network architecture
-
Tune the hyperparameters to the model
The primary benefits include:
-
Being able to perform machine learning and deep learning with little expertise
-
Obtaining a high accuracy model with the ability to generalize to data outside the training and testing set
-
Getting up and running quickly with either a GUI interface or a simple API
-
A potentially state-of-the-art performance with little effort
Of course, there is a price to be paid — two prices in fact.
First, Google’s AutoML is expensive, approximately $20/hour.
To save funds you could go with Auto-Keras, an open source alternative to Google’s AutoML, but you still need to pay for GPU compute time.
Replacing an actual deep learning expert with a NAS algorithm will require many hours of computing to search for optimal parameters.
While we achieved a high accuracy model for CIFAR-10 (~96% accuracy), when I applied Auto-Keras to my previous post on medical deep learning and malaria prediction, Auto-Keras only achieved 96.1% accuracy, a full percentage point lower than my 97% accuracy (and Auto-Keras required 2,300% more compute time!)
While Auto-Keras and AutoML may be a step in the right direction in terms of automated machine learning and deep learning, there is still quite a bit of work to be done in this area.
There is no silver bullet for solving machine learning/deep learning with off-the-shelf algorithms. Instead, I recommend you invest in yourself as a deep learning practitioner and engineer.
The skills you learn today and tomorrow will pay off tremendously in the future.
I hope you enjoyed today’s tutorial!
To download the source code to this post (and be notified when future tutorials are published here on PyImageSearch), just enter your email address in the form below!