Contact centers aiming to improve overall operational efficiency have an imperative to understand caller-agent dynamics. In part one of this two-part blog post series we’ll show you how you can use Amazon Transcribe and Amazon Comprehend to transform call recordings from audio to text and then run sentiment analysis on the transcripts. We will demonstrate how to use Amazon Transcribe to create text transcripts from an audio file. Afterwards, we’ll use Amazon Comprehend to analyze the call transcript, producing insights on keywords, topics, entities, and sentiment.
AWS services leveraged
Amazon Transcribe is an automatic speech recognition (ASR) service that makes it easy for developers to add speech-to-text capability to their applications. Using the Amazon Transcribe API, you can transcribe audio files stored in Amazon S3 into text transcripts.
Amazon Comprehend analyzes text and tells you what it finds, starting with the language, from Afrikaans to Yoruba, with 98 more in between. It can identify different types of entities (people, places, brands, products, and so forth), key phrases, sentiment (positive, negative, mixed, or neutral), and extract key phrases, all from text in English or Spanish. Finally, the Amazon Comprehend topic modeling service extracts topics from large sets of documents for analysis or topic-based grouping.
AWS Lambda lets you run code without provisioning or managing servers. You pay only for the compute time you consume – there is no charge when your code is not running.
AWS Step Functions makes it easy to coordinate the components of distributed applications and microservices using visual workflows.
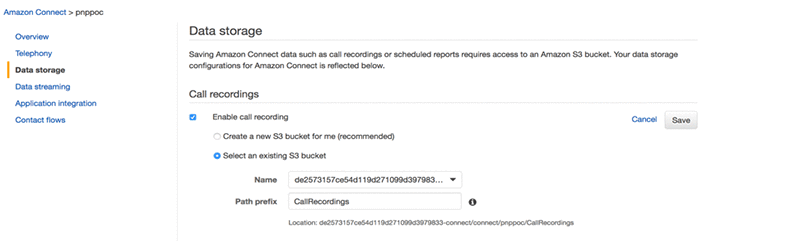
Amazon Connect is a self-service, cloud-based contact center service that makes it easy for any business to deliver better customer service at lower cost. Amazon connect produces Call Recordings between caller and Agent interactions.
Solution overview
The architecture is broadly divided into these components, as the following diagram illustrates:
-
Audio Transcript Storage → Amazon S3 bucket
-
Orchestration component and business logic component → AWS Step Functions and AWS Lambda
-
Transcribing component → Amazon Transcribe
-
Sentiment analysis component → Amazon Comprehend
-
Notification component → SNS Topic
-
Amazon Comprehend → Entity, sentiment, key phrases, and language output into an Amazon S3 bucket
-
AWS Glue maintains the database catalogue and database table structure. Amazon Athena queries data in Amazon S3 using the AWS Glue database catalogue.
-
Amazon QuickSight analyzes call recording and performs sentiment, and performs a key phrases analysis of caller-agent interactions.
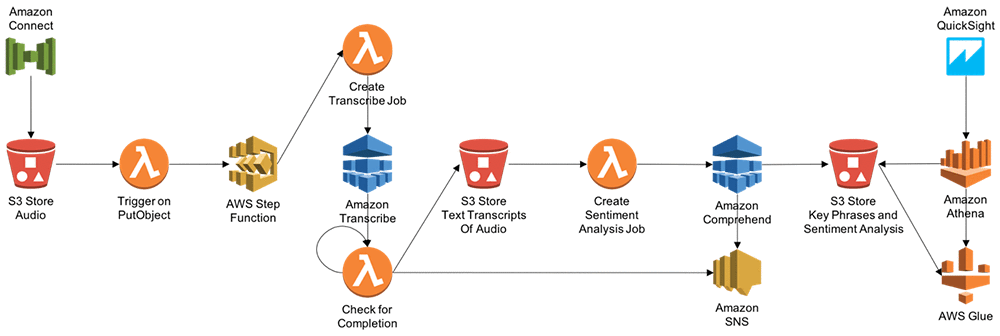
Transcribe call center audio, run sentiment analysis, and visualize analytics
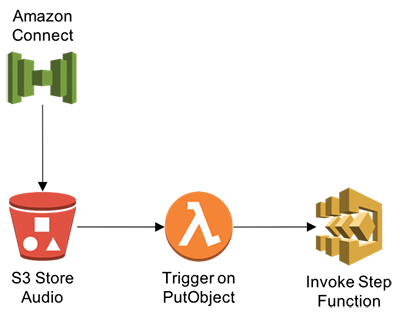
After uploading audio files to an Amazon S3 bucket, we’ll trigger a Lambda function to invoke Step Functions that will point the Amazon Transcribe service to the bucket destination to create transcription jobs. Accepted audio/visual formats include: WAV, FLAC, MP3, and MP4.
Step 1: Create the Lambda function and IAM policy
-
Open the AWS Management Console and navigate to the Lambda console. Then choose Create a Lambda function.
-
Choose Skip to skip the blueprint selection.
-
For Runtime, choose Node JS 8.10.
-
For Name, enter a function name.
-
Enter a description that notes the source bucket and destination bucket used.
-
For Code entry type, choose Edit code inline.
-
Create environment variable – STEP_FUNCTIONS_ARN
Paste the following into the code editor:
‘use strict’;
const aws = require(‘aws-sdk’);
var stepfunctions = new aws.StepFunctions(); const s3 = new aws.S3({apiVersion: ‘2006-03-01’});
exports.handler = (event, context, callback) => { const bucket = event.Records[0].s3.bucket.name; const key = decodeURIComponent(event.Records[0].s3.object.key.replace(/+/g, ‘ ‘)); const params = {Bucket: bucket,Key: key};
s3.getObject(params, (err, data) => {
if (err) {
console.log(err);
const message = Error getting object ${key} from bucket ${bucket}. Make sure they exist and your bucket is in the same region as this function.;
console.log(message);
callback(message);
} else {
var job_name = key.replace(“/”, “-“);
var stepparams = {
“stateMachineArn”: process.env.STEP_FUNCTIONS_ARN,
“input”: “{"s3URL": "https://s3.amazonaws.com/” + bucket + “/” + key + “","JOB_NAME": "”+ job_name + “"}”
};
stepfunctions.startExecution(stepparams, function(err, data) {
if (err) console.log(err, err.stack); // an error occurred
else console.log(data); // successful response
});
callback(null, data.ContentType);
}
});
};
Step 2: Create source Amazon S3 bucket
-
Navigate to the Amazon S3 console and edit the source bucket configuration.
-
Expand the Events section and provide a name for the new event.
-
For Events, choose ObjectCreated (ALL).
-
For Send to, choose Lambda Functions.
-
For Lambda Function, select the Lambda function name you chose in Step 1.
-
Choose Save
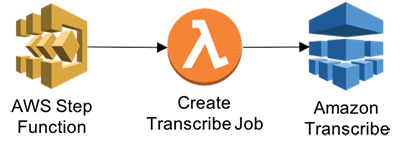
Step 3: Create Transcribe and Comprehend APIs using a Lambda function
Trigger Transcribe job based on the input S3 audio transcript received. Two parameters are received – s3URL and JOB name.
-
Navigate to the Lambda console, and then choose Create a Lambda function.
-
Choose Skip to skip the blueprint selection.
-
For Runtime, choose Node JS 8.10.
-
For Name, enter a function name.
-
Enter a description that notes Create Transcribe JOB based on the input received.
-
For Code entry type, choose Edit code inline.
Paste the following into the code editor:
var AWS = require(‘aws-sdk’); var transcribeservice = new AWS.TranscribeService(); exports.handler = (event, context, callback) => { var params = { LanguageCode: ‘en-US’, Media: { /* required */ MediaFileUri: event.s3URL + “” }, MediaFormat: ‘mp3’, TranscriptionJobName: event.JOB_NAME
}; transcribeservice.startTranscriptionJob(params, function(err, data) { if (err) console.log(err, err.stack); // an error occurred else { console.log(data); // successful response event.wait_time = 60; event.JOB_NAME = data.TranscriptionJob.TranscriptionJobName; callback(null, event); } });
};
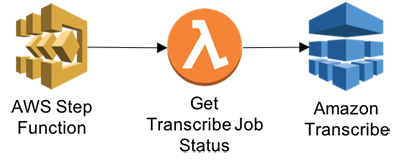
Step 4: Get Transcribe Job Status
Get transcribe JOB status. This function will enable Step functions to wait for transcribe job to complete.
-
In the Lambda console, choose Create a Lambda function.
-
Choose Skip to skip the blueprint selection.
-
For Runtime, choose Node JS 8.10.
-
For Name, enter a function name.
-
Enter a description that notes Transcribe JOB details.
-
For Code entry type, choose Edit code inline.
Paste the following into the code editor:
var AWS = require(‘aws-sdk’); var transcribeservice = new AWS.TranscribeService();
exports.handler = (event, context, callback) => { var params = { TranscriptionJobName: event.JOB_NAME /* required */ }; transcribeservice.getTranscriptionJob(params, function(err, data) { if (err) console.log(err, err.stack); // an error occurred else console.log(data); // successful response event.STATUS = data.TranscriptionJob.TranscriptionJobStatus; event.Transcript =data.TranscriptionJob.Transcript; callback(null,event); }); };
Step 5: Get transcribe job details
This function will enable Step Functions to get transcribe JOB details once completed.

-
In the Lambda console, choose Create a Lambda function.
-
Choose Skip to skip the blueprint selection.
-
For Runtime, choose Node JS 8.10.
-
For Name, enter a function name.
-
Enter a description that notes get information about the transcribe job.
-
For Code entry type, choose Edit code inline.
Paste the following into the code editor:
var AWS = require(‘aws-sdk’); var transcribeservice = new AWS.TranscribeService();
exports.handler = (event, context, callback) => {
var params = { TranscriptionJobName: event.JOB_NAME /* required */ }; transcribeservice.getTranscriptionJob(params, function(err, data) { if (err) console.log(err, err.stack); // an error occurred else console.log(data); // successful response event.STATUS = data.TranscriptionJob.TranscriptionJobStatus; event.TranscriptFileUri =data.TranscriptionJob.Transcript.TranscriptFileUri; callback(null,event); }); };
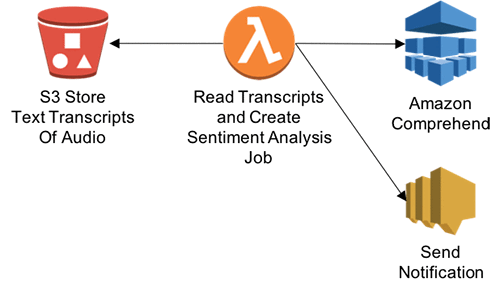
Step 6: Call Amazon Comprehend to analyze transcription text
In this step, you’ll get transcribed audio text and perform contextual analysis. This function will enable Step Functions to call Amazon Comprehend to perform sentiment analysis.
-
In the Lambda console, choose Create a Lambda function.
-
Choose Skip to skip the blueprint selection.
-
For Runtime, choose Node JS 8.10.
-
For Name, enter a function name.
-
Enter a description that notes get information about the transcribe job.
-
For Code entry type, choose Edit code inline.
Paste the following into the code editor:
var https = require(‘https’); let AWS = require(‘aws-sdk’); var comprehend = new AWS.Comprehend({apiVersion: ‘2017-11-27’}); exports.handler = function(event, context, callback) { var request_url = event.request_url; https.get(request_url, (res) => { var chunks = []; res.on(“data”, function (chunk) { chunks.push(chunk); }); res.on(“end”, function () { var body = Buffer.concat(chunks); var results = JSON.parse(body); console.log( body.toString()); var transcript = results.results.transcripts[0].transcript; console.log(transcript) var params = { LanguageCode: “en”, Text: transcript + “” }; comprehend.detectSentiment(params, function(err, data) { if (err) console.log(err, err.stack); // an error occurred else console.log(data); // successful response callback(null, data); }); callback(null, transcript); });
}).on(‘error’, (e) => { console.error(e); }); };
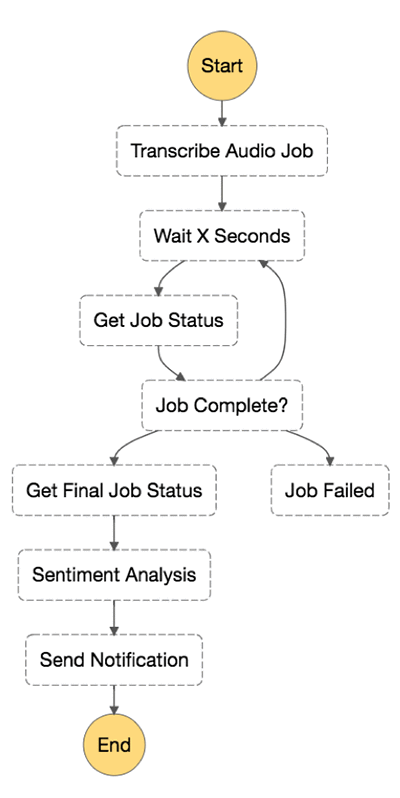
Step 7: Invoke Step Functions
In this step you will leverage AWS Steps Functions orchestrate the Lambda functions created earlier and notify the end customer about the contextual analysis.
-
In the Step Functions console, choose Create a state machine.
-
Choose Author from scratch
-
For Name, Enter your State Machine Name For example : TranscribeJob.
-
Paste the following code in State machine definition
-
Update the ARN values of lambda functions created in earlier steps in the State machine definition code
-
Click Next
-
Choose existing role which has permissions to invoke lambda functions, send SNS (Create the custom role if the role doesn’t exists)
-
Click Create state machine
1 | |
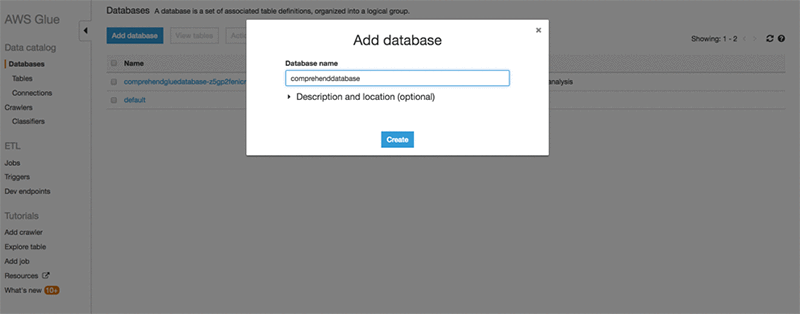
Step 8: Create an AWS Glue database for visualization
Navigate to the AWS Glue console and create a database to store sentiment analysis entities.
Add the AWS Glue table to the database you just created.
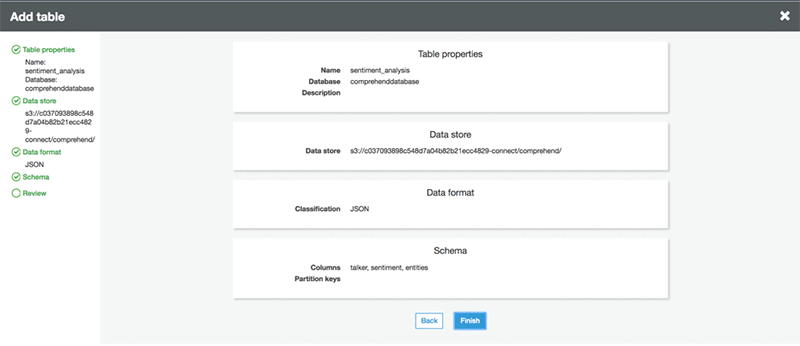
A created table in database looks like this:
Step 9: Visualization using Amazon QuickSight
To visualize Amazon Comprehend output using Amazon QuickSight, do the following:
Connect Amazon QuickSight to Amazon Athena.
-
https://docs.aws.amazon.com/quicksight/latest/user/create-a-data-set-athena.html
-
https://docs.aws.amazon.com/quicksight/latest/user/managing-permissions.html
-
https://aws.amazon.com/blogs/big-data/derive-insights-from-iot-in-minutes-using-aws-iot-amazon-kinesis-firehose-amazon-athena-and-amazon-quicksight/
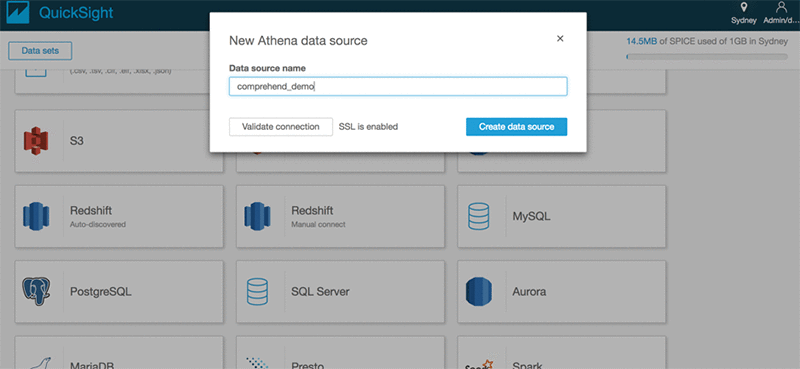
After setting up permissions, create a new analysis in Amazon QuickSight by choosing New analysis.

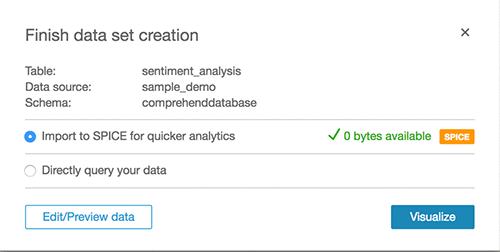
Add a new data set.
Choose Athena as the source and give the data source a name, such as comprehend_demo.
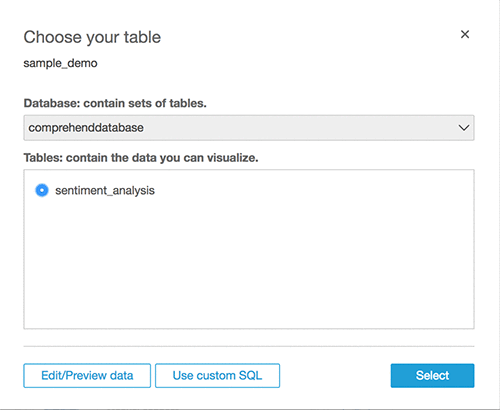
ClickSelect to choose the database and table.
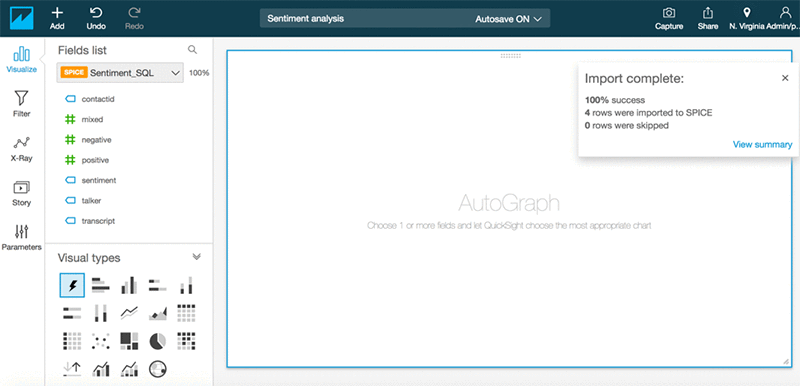
Click Visualize.
Create custom visualizations.
Conclusion
Enterprises can reap significant benefits by realizing the hidden value in the massive amounts of caller-agent audio recordings from their contact centers. By deriving meaningful insights, enterprises can enhance both efficiency and performance of call centers and improve their overall service quality to end customers. So far, we’ve used Amazon Transcribe to transform audio data into text transcripts and then used Amazon Comprehend to run text analysis. Along the way, we’ve also used AWS Lambda and AWS Step Functions to string together the solution. And finally, AWS Glue, Amazon Athena, and AWS QuickSight to visualize the analysis. The AWS CloudFormation templates used to build and deploy this process are available on part 2 of the next post.
In Part 2 of this blog post series we’ll show you how to automate, deploy, and visualize analytics using Amazon Transcribe, Amazon Comprehend, AWS CloudFormation, and Amazon QuickSight.
About the Authors
 Deenadayaalan Thirugnanasambandam is a Senior Cloud Architect in the Professional Services team in Australia.
 Piyush Patel is a big data consultant with AWS.
 Paul Zhao is a Sr. Product Manager at AWS Machine Learning. He manages the Amazon Transcribe service. Outside of work, Paul is a motorcycle enthusiast and avid woodworker.
 Revanth Anireddy is a professional services consultant with AWS.
 Loc Trinh is a Solutions Architect for AWS Database and Analytics services. In his spare time, he captures data from his eating and fitness habits and uses analytical modeling to determine why he is still out of shape.