
In this tutorial, you will learn how to create animated GIFs using OpenCV, Python, and ImageMagick.
You’ll then combine all of these techniques to build a meme generator with OpenCV!
We all need a good laugh every now and then. And perhaps the best way to find LOLs is from memes.
Some of my favorite all-time memes include:
-
Kermit the Frog’s “But That’s None of My Business�
-
Grumpy Cat
-
Epic Fail
-
Good Guy Greg
But for me personally, none of these memes compare to the “Deal With It� meme (an example of which is at the top of this post), normally:
-
Used as a response or retort to someone being disapproving of something you did/said
-
Involving putting on sunglasses as you walk away, leaving them to “deal with it”
A few years ago I saw a lighthearted blog post from an author I now cannot remember on how to generate these memes with computer vision. Last week I couldn’t find the tutorial anywhere, so, as a blogger, computer vision expert, and meme connoisseur, *I decided to create my own! *(BTW, if you do happen to know the original source of the idea please let me know so I can credit the author UPDATE: I just found out the original article I’m thinking of is from Kirk Kaiser’s blog, MakeArtWithPython).
Building a Deal With It meme generator using OpenCV can teach us a number of valuable techniques used in practice, including:
-
How to perform deep learning-based face detection
-
How to use the dlib library to apply facial landmark detection and extract the eye regions
-
How to take these two regions and compute the rotation angle between the eyes
-
And finally, how to generate animated GIFs with OpenCV (with a little help from ImageMagick)
Today’s tutorial is meant to be fun, jovial, and entertaining — all while teaching you valuablecomputer vision skills that are used in the real world.
To learn how to generate GIFs and memes with OpenCV, just keep reading!
Creating GIFs with OpenCV
In today’s blog post, we are going to create animated GIFs with OpenCV, dlib, and the ImageMagick toolbox.
In the first part of the tutorial, we’ll discuss the prerequisites and dependencies for this project, including how to properly configure your development environment.
From there we’ll review the project/directory structure for our OpenCV GIF creator.
Once we understand the project structure we’ll review (1) our configuration file, and (2) our Python script responsible for creating GIFs with OpenCV.
Finally, we’ll take a look at the results of our OpenCV GIF creator by building a meme generator for the popular “Deal With It� meme.
Prerequisites and dependencies
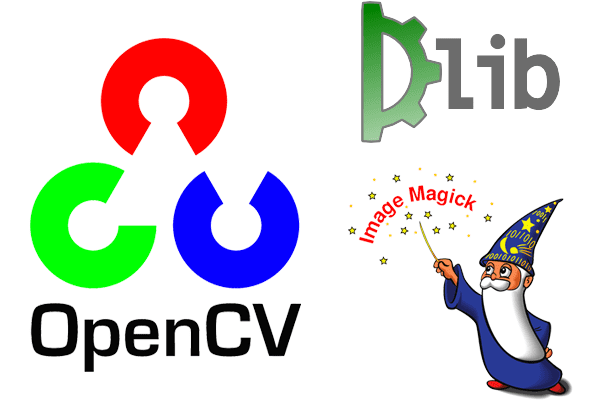
Figure 1: To create GIFs with OpenCV we’ll be taking advantage of OpenCV, dlib, and ImageMagick.
OpenCV and dlib
OpenCV will be used for face detection and basic image processing. Be sure to follow one of my OpenCV installation guides if you do not have OpenCV installed on your system.
Dlib will be utilized for detecting facial landmarks, enabling us to find the two eyes of a face and lower the sunglasses on top of them. You can install dlib with this guide.
ImageMagick
If you aren’t familiar with ImageMagick, you should be. ImageMagick is a cross-platform command line based tool providing quite a bit of image processing functionality.
Want to turn a PNG/JPG into a PDF with a single command? No problem.
Have multiple images you’d like to turn into PDF slides? That’s easy.
Do you have a need to draw polygons, lines, and other shapes? Go for it.
What about batch color adjustments or adjusting the spatial dimensions of an entire image dataset in a single command? There’s no point in writing multiple lines of Python to use OpenCV for that.
Using ImageMagick we can generate GIF images via a set of input images as well.
To install ImageMagick on Ubuntu (or Raspbian) simply use apt:
| $ sudo apt-get install imagemagick |
Or if you’re on macOS, you may utilize HomeBrew:
| $ brew install imagemagick |
imutils Much of my blog posts and book/course content take advantage of my handy package of image processing convenience functions called imutils. You can install imutils on your system or virtual environment by using pip:
Project structure
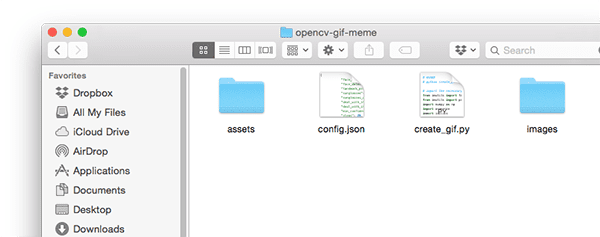 Figure 2: Our OpenCV GIF generator project structure consists of two directories, a config file, and a single Python script.
Our project has two directories:
images/ : Our example input images that we wish to create the animated “Deal With it” GIF for. I’ve provided a selection of images of me but feel free to add your own.
assets/ : This folder contains our face detector, facial landmark detector and all images + associated masks. We’ll be overlaying the “sunglasses” and “Deal With It” text on input image with these assets.
Due to the number of configurable parameters, I decided to create a JSON configuration file (1) making it easier to edit parameters, and (2) requiring fewer command line arguments. All configuration parameters we’ll need for this project are contained inside config.json .
Today we’ll be reviewing both config.json and create_gif.py .
The entire project is available for you to hack with in the “Downloads” section of today’s tutorial!
Generating GIFs with OpenCV
Let’s go ahead and get started implementing our OpenCV GIF generator!
Understanding our JSON configuration file
We’ll start with the JSON configuration file first and from there move into the Python script.
Go ahead and open a new file called config.json and then insert the following key/value pairs:
| { “face_detector_prototxt”: “assets/deploy.prototxt”, “face_detector_weights”: “assets/res10_300x300_ssd_iter_140000.caffemodel”, “landmark_predictor”: “assets/shape_predictor_68_face_landmarks.dat”, |
“face_detector_prototxt”: “assets/deploy.prototxt”,
“landmark_predictor”: “assets/shape_predictor_68_face_landmarks.dat”,
Lines 2 and 3 are OpenCV’s deep learning face detector model files.
Line 4 is the path to dlib’s facial landmark predictor.
And now we have some image file paths:
| “sunglasses”: “assets/sunglasses.png”, “sunglasses_mask”: “assets/sunglasses_mask.png”, “deal_with_it”: “assets/deal_with_it.png”, “deal_with_it_mask”: “assets/deal_with_it_mask.png”, |
“sunglasses_mask”: “assets/sunglasses_mask.png”,
“deal_with_it_mask”: “assets/deal_with_it_mask.png”,
Lines 5-8 are the paths to our Deal With It sunglasses, text, and associated masks for both, respectively — each of which is pictured below.
First our fancy sunglasses and associated mask:

Figure 3: Do you dislike pixelated sunglasses? Deal with it.

Figure 4: Are you wondering WTH this sunglasses mask is for? Deal with it — or just read the rest of the blog post for the answer.
And now our “DEAL WITH IT” text and mask:

Figure 5: Do you loathe Helvetica Neue Condensed? Deal with it.

Figure 6: This mask will allow for a border. Oh, I’m guessing you don’t want a border around your text. Deal with it.
We need the masks in order to overlay the corresponding image on the photo, a process I’ll show you how to perform later in today’s tutorial.
Now let’s set some parameters for our meme generator:
| “min_confidence”: 0.5, “steps”: 20, “delay”: 5, “final_delay”: 250, “loop”: 0, “temp_dir”: “temp”} |
“steps”: 20,
“final_delay”: 250,
“temp_dir”: “temp”
Below you can find definitions for each of the parameters:
min_confidence : Minimum required probability of a positive face detection.
steps : # of frames we’ll be generating for the output GIF. Each “step� will move the sunglasses from the top of the frame farther down towards the target (i.e., the eyes).
delay : # of hundredths of a second delay between each frame.
final_delay : # of hundredths of a second delay for the final frame (useful in this context since we want the “Deal With It� text to be visible for longer than the rest of the frames).
loop : Whether or not the GIF will loop (a value of zero indicates the GIF will loop forever, otherwise supply a positive integer for the number of times the GIF is allowed to loop).
temp_dir : Temporary output directory where each of the frames will be stored prior to constructing the final GIF image.
Memes, GIFs, and OpenCV
Now that we’ve created our JSON configuration file, let’s move into the actual code.
Open up a new file, name it create_gif.py , and insert the following code:
| # import the necessary packagesfrom imutils import face_utilsfrom imutils import pathsimport numpy as npimport argparseimport imutilsimport shutilimport jsonimport dlibimport cv2import sysimport os |
from imutils import face_utils
import numpy as np
import imutils
import json
import cv2
import os
On Lines 2-12 we import our necessary packages. Notably, we’ll be using imutils, dlib, and OpenCV. To install these dependencies see the “Prerequisites and dependencies” section above.
Now that our script has the required packages at our disposal, let’s define the overlay_image function:
| 141516171819202122232425262728293031323334353637383940 | def overlay_image(bg, fg, fgMask, coords): # grab the foreground spatial dimensions (width and height), # then unpack the coordinates tuple (i.e., where in the image # the foreground will be placed) (sH, sW) = fg.shape[:2] (x, y) = coords # the overlay should be the same width and height as the input # image and be totally blank except for the foreground which # we add to the overlay via array slicing overlay = np.zeros(bg.shape, dtype=”uint8”) overlay[y:y + sH, x:x + sW] = fg # the alpha channel, which controls where and how much # transparency a given region has, should also be the same # width and height as our input image, but will contain only # our foreground mask alpha = np.zeros(bg.shape[:2], dtype=”uint8”) alpha[y:y + sH, x:x + sW] = fgMask alpha = np.dstack([alpha] * 3) # perform alpha blending to merge the foreground, background, # and alpha channel together output = alpha_blend(overlay, bg, alpha) # return the output image return output |
15
17
19
21
23
25
27
29
31
33
35
37
39
# grab the foreground spatial dimensions (width and height),
# the foreground will be placed)
(x, y) = coords
# the overlay should be the same width and height as the input
# we add to the overlay via array slicing
overlay[y:y + sH, x:x + sW] = fg
# the alpha channel, which controls where and how much
# width and height as our input image, but will contain only
alpha = np.zeros(bg.shape[:2], dtype=”uint8”)
alpha = np.dstack([alpha] * 3)
# perform alpha blending to merge the foreground, background,
output = alpha_blend(overlay, bg, alpha)
# return the output image
The overlay_image function overlays a foreground image ( fg ) on top of a background image ( bg ) at location coords (which are (x, y)-coordinates), allowing for alpha transparency via the foreground mask fgMask .
To review OpenCV basics such as working with masks, be sure to give this tutorial a read.
To finish the overlay process we need to apply alpha blending:
| 424344454647484950515253545556575859 | def alpha_blend(fg, bg, alpha): # convert the foreground, background, and alpha layers from # unsigned 8-bit integers to floats, making sure to scale the # alpha layer to the range [0, 1] fg = fg.astype(“float”) bg = bg.astype(“float”) alpha = alpha.astype(“float”) / 255 # perform alpha blending fg = cv2.multiply(alpha, fg) bg = cv2.multiply(1 - alpha, bg) # add the foreground and background to obtain the final output # image output = cv2.add(fg, bg) # return the output image return output.astype(“uint8”) |
43
45
47
49
51
53
55
57
59
# convert the foreground, background, and alpha layers from
# alpha layer to the range [0, 1]
bg = bg.astype(“float”)
fg = cv2.multiply(alpha, fg)
# image
return output.astype(“uint8”)
This implementation of alpha blending is also covered on the LearnOpenCV blog.
In essence, we’ll convert the foreground, background, and alpha layers to floats in the range of [0, 1] (Lines 46-48). Then we’ll perform the actual alpha blending (Lines 51 and 52). And finally, we’ll add the foreground and background to obtain our output which we then return to the calling function (Lines 37-40).
Let’s also create a helper function that will enable us to generate a GIF from a set of image paths using ImageMagick and the convert command:
| 616263646566676869707172737475 | def create_gif(inputPath, outputPath, delay, finalDelay, loop): # grab all image paths in the input directory imagePaths = sorted(list(paths.list_images(inputPath))) # remove the last image path in the list lastPath = imagePaths[-1] imagePaths = imagePaths[:-1] # construct the image magick ‘convert’ command that will be used # generate our output GIF, giving a larger delay to the final # frame (if so desired) cmd = “convert -delay {} {} -delay {} {} -loop {} {}”.format( delay, “ “.join(imagePaths), finalDelay, lastPath, loop, outputPath) os.system(cmd) |
62
64
66
68
70
72
74
# grab all image paths in the input directory
lastPath = imagePaths[-1]
# generate our output GIF, giving a larger delay to the final
cmd = “convert -delay {} {} -delay {} {} -loop {} {}”.format(
outputPath)
The create_gif function takes a set of images and assembles them in a GIF animation with the specified delay between frames and loops if necessary. All of this is handled by ImageMagick — we’re simply wrapping the command line convert command with a function that dynamically handles different parameters.
To review the available command line arguments for the convert command, refer to the documentation. As you can tell from the docs, there is a lot of functionality built into convert !
Specifically, in this function we:
Grab imagePaths (Line 63).
- Grab the last image path since it will have a separate delay (Line 66).
Reassign the imagePaths to exclude the last image path (Line 67). Assemble the command string with command line arguments and then instruct the operating system to execute convert to create the GIF (Lines 72-75).
Let’s construct our own script’s command line arguments:
| # construct the argument parser and parse the argumentsap = argparse.ArgumentParser()ap.add_argument(“-c”, “–config”, required=True, help=”path to configuration file”)ap.add_argument(“-i”, “–image”, required=True, help=”path to input image”)ap.add_argument(“-o”, “–output”, required=True, help=”path to output GIF”)args = vars(ap.parse_args()) |
ap = argparse.ArgumentParser()
help=”path to configuration file”)
help=”path to input image”)
help=”path to output GIF”)
We have three command line arguments which are processed at runtime:
–config : The path to our JSON configuration file. We reviewed the config file in the previous section.
–image : Path to our input image. We’ll be creating our animation with this image (i.e. finding the face + adding sunglasses and then adding the “Deal With It” text).
–output : The target path to our output GIF.
Each of these arguments is required when you execute the script in your command line/terminal.
Let’s load the config file as well as our sunglasses + associated mask:
| # load the JSON configuration file and the “Deal With It” sunglasses# and associated maskconfig = json.loads(open(args[“config”]).read())sg = cv2.imread(config[“sunglasses”])sgMask = cv2.imread(config[“sunglasses_mask”]) # delete any existing temporary directory (if it exists) and then# create a new, empty directory where we’ll store each individual# frame in the GIFshutil.rmtree(config[“temp_dir”], ignore_errors=True)os.makedirs(config[“temp_dir”]) |
and associated mask
sg = cv2.imread(config[“sunglasses”])
create a new, empty directory where we’ll store each individual
shutil.rmtree(config[“temp_dir”], ignore_errors=True)
Here we load the configuration file (which can be accessed like a Python dictionary from here forward) on Line 89. Then we load the sunglasses image and sunglasses mask (Lines 90 and 91).
In case there are any remnants from a previous run of the script, we remove the temporary directory from disk and then recreate an empty temporary directory (Lines 96 and 97). The temporary folder will hold each individual frame in the GIF.
Now let’s load OpenCV’s deep learning face detector into memory:
| # load our OpenCV face detector and dlib facial landmark predictorprint(“[INFO] loading models…“)detector = cv2.dnn.readNetFromCaffe(config[“face_detector_prototxt”], config[“face_detector_weights”])predictor = dlib.shape_predictor(config[“landmark_predictor”]) |
print(“[INFO] loading models…”)
config[“face_detector_weights”])
To load OpenCV’s deep learning face detector, we call
cv2.dnn.readNetFromCaffe (Lines 101 and 102). The
dnn module is only accessible in OpenCV 3.3 or later. The face detector will enable us to detect the presence of faces in images:
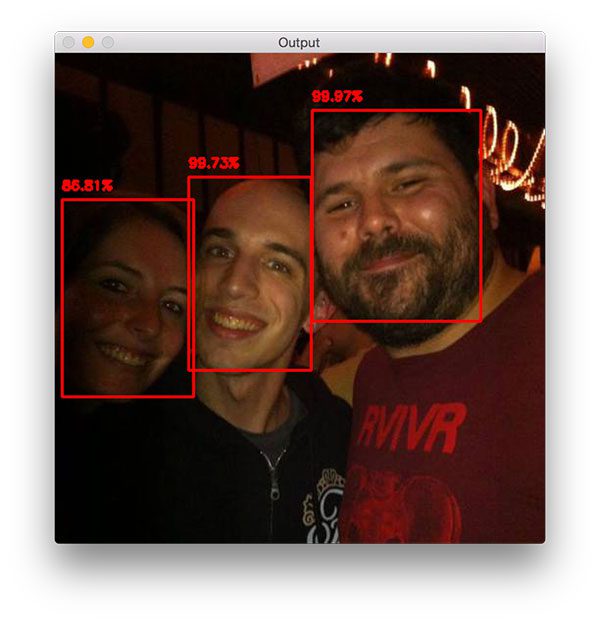
Figure 7: The OpenCV DNN face detector finds faces in images.
Then, on Line 103, we load dlib’s facial landmark predictor. The facial landmark predictor, on the other hand, will enable us to localize structures of the face, such as eyes, eyebrows, nose, mouth, and jawline:
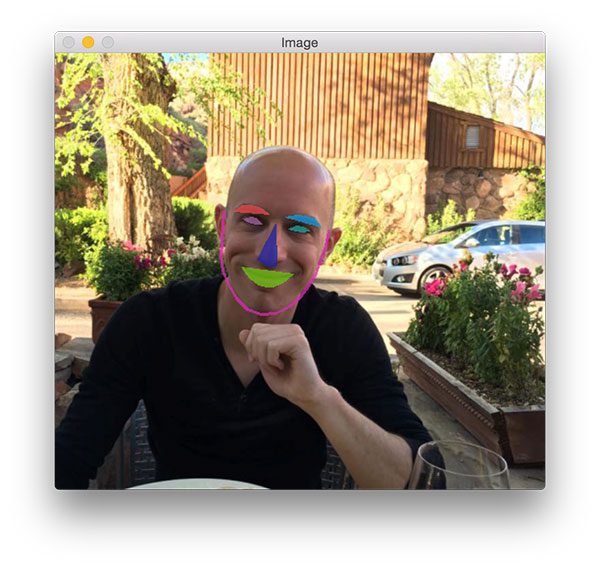
Figure 8: Shown on my face are overlays of the facial landmarks detected by dlib.
Later in this script, we’ll be extracting just the eye regions.
Moving on, let’s detect the face:
| 105106107108109110111112113114115116117118119120121122123124125 | # load the input image and construct an input blob from the imageimage = cv2.imread(args[“image”])(H, W) = image.shape[:2]blob = cv2.dnn.blobFromImage(cv2.resize(image, (300, 300)), 1.0, (300, 300), (104.0, 177.0, 123.0)) # pass the blob through the network and obtain the detectionsprint(“[INFO] computing object detections…“)detector.setInput(blob)detections = detector.forward() # we’ll assume there is only one face we’ll be applying the “Deal# With It” sunglasses to so let’s find the detection with the largest# probabilityi = np.argmax(detections[0, 0, :, 2])confidence = detections[0, 0, i, 2] # filter out weak detectionsif confidence < config[“min_confidence”]: print(“[INFO] no reliable faces found”) sys.exit(0) |
106
108
110
112
114
116
118
120
122
124
image = cv2.imread(args[“image”])
blob = cv2.dnn.blobFromImage(cv2.resize(image, (300, 300)), 1.0,
print(“[INFO] computing object detections…”)
detections = detector.forward()
we’ll assume there is only one face we’ll be applying the “Deal
probability
confidence = detections[0, 0, i, 2]
filter out weak detections
print(“[INFO] no reliable faces found”)
In this block we:
Load input image (Line 106). Construct a blob to send through the face detector neural network (Lines 108 and 109). You can learn how OpenCV’s blobFromImage works in this blog post.
-
Perform face detection (Lines 113 and 114).
-
Determine the face detection with the largest probability and check versus the confidence threshold (Lines 119-124). If the criteria isn’t met, we simply exit the script (Line 125). Otherwise, we’ll continue on.
Let’s extract the face and calculate facial landmarks:
| 127128129130131132133134135136137138139140141142 | # compute the (x, y)-coordinates of the bounding box for the facebox = detections[0, 0, i, 3:7] * np.array([W, H, W, H])(startX, startY, endX, endY) = box.astype(“int”) # construct a dlib rectangle object from our bounding box coordinates# and then determine the facial landmarks for the face regionrect = dlib.rectangle(int(startX), int(startY), int(endX), int(endY))shape = predictor(image, rect)shape = face_utils.shape_to_np(shape) # grab the indexes of the facial landmarks for the left and right# eye, respectively, then extract (x, y)-coordinates for each eye(lStart, lEnd) = face_utils.FACIAL_LANDMARKS_IDXS“left_eye” = face_utils.FACIAL_LANDMARKS_IDXS[“right_eye”]leftEyePts = shape[lStart:lEnd]rightEyePts = shape[rStart:rEnd] |
128
130
132
134
136
138
140
142
box = detections[0, 0, i, 3:7] * np.array([W, H, W, H])
and then determine the facial landmarks for the face region
shape = predictor(image, rect)
eye, respectively, then extract (x, y)-coordinates for each eye
(rStart, rEnd) = face_utils.FACIAL_LANDMARKS_IDXS[“right_eye”]
rightEyePts = shape[rStart:rEnd]
To extract the face and find facial landmarks, we:
- Extract the bounding box coordinates of the face (Lines 128 and 129).
Construct a dlib rectangle object (Line 133) and apply facial landmark localization (Lines 134 and 135). Extract the (x, y)-coordinates for the leftEyePts and rightEyePts respectively (Lines 139-142).
Given the coordinates of the eyes we can calculate where and how the sunglasses need to be placed:
| 144145146147148149150151152153154155156157158159160161162163164165166167168169170171172173 | # compute the center of mass for each eyeleftEyeCenter = leftEyePts.mean(axis=0).astype(“int”)rightEyeCenter = rightEyePts.mean(axis=0).astype(“int”) # compute the angle between the eye centroidsdY = rightEyeCenter[1] - leftEyeCenter[1]dX = rightEyeCenter[0] - leftEyeCenter[0]angle = np.degrees(np.arctan2(dY, dX)) - 180 # rotate the sunglasses image by our computed angle, ensuring the# sunglasses will align with how the head is tiltedsg = imutils.rotate_bound(sg, angle) # the sunglasses shouldn’t be the entire width of the face and# ideally should just cover the eyes – here we’ll do a quick# approximation and use 90% of the face width for the sunglasses# widthsgW = int((endX - startX) * 0.9)sg = imutils.resize(sg, width=sgW) # our sunglasses contain transparency (the bottom parts, underneath# the lenses and nose) so in order to achieve that transparency in# the output image we need a mask which we’ll use in conjunction with# alpha blending to obtain the desired result – here we’re binarizing# our mask and performing the same image processing operations as# abovesgMask = cv2.cvtColor(sgMask, cv2.COLOR_BGR2GRAY)sgMask = cv2.threshold(sgMask, 0, 255, cv2.THRESH_BINARY)[1]sgMask = imutils.rotate_bound(sgMask, angle)sgMask = imutils.resize(sgMask, width=sgW, inter=cv2.INTER_NEAREST) |
145
147
149
151
153
155
157
159
161
163
165
167
169
171
173
leftEyeCenter = leftEyePts.mean(axis=0).astype(“int”)
dY = rightEyeCenter[1] - leftEyeCenter[1]
angle = np.degrees(np.arctan2(dY, dX)) - 180
rotate the sunglasses image by our computed angle, ensuring the
sg = imutils.rotate_bound(sg, angle)
the sunglasses shouldn’t be the entire width of the face and
approximation and use 90% of the face width for the sunglasses
sgW = int((endX - startX) * 0.9)
the lenses and nose) so in order to achieve that transparency in
alpha blending to obtain the desired result – here we’re binarizing
above
sgMask = cv2.threshold(sgMask, 0, 255, cv2.THRESH_BINARY)[1]
sgMask = imutils.resize(sgMask, width=sgW, inter=cv2.INTER_NEAREST)
First, we compute the center of each eye then calculate the angle between the eye centroids (Lines 145-151), just as if we were performing face alignment.
From there we can rotate (Line 155) and resize (Lines 161 and 162) the sunglasses. Notice that we’re using the rotate_bound function. We’re using rotate_bound here instead of just rotate to ensure OpenCV does not clip off parts of the image that are out of view after the affine transformation.
The same operations we applied to the sunglasses themselves need to be applied to the mask. But first, we need to convert the mask to grayscale and binarize it (Lines 170 and 171) since masks are always binary. Then we proceed to rotate and resize the mask exactly as we did to the sunglasses on Lines 172 and 173.
Note: Notice that we are using nearest neighbor interpolation when resizing the mask. This is because our mask should only have two values (0 and 255). Other interpolation methods may be more aesthetically pleasing to the eye but will actually be harmful to our mask. You can read more about nearest neighbor interpolation here.
The remaining three code blocks will create the frames of our GIF:
| 175176177178179180181182183184185186187188189190191192193194195 | # our sunglasses will drop down from the top of the frame so let’s# define N equally spaced steps between the top of the frame and the# desired end locationsteps = np.linspace(0, rightEyeCenter[1], config[“steps”], dtype=”int”) # start looping over the stepsfor (i, y) in enumerate(steps): # compute our translation values to move the sunglasses both # slighty to the left and slightly up – the reason why we are # doing this is so the sunglasses don’t start directly at # the center of our eye, translation helps us shift the # sunglasses to adequately cover our entire eyes (otherwise # what good are sunglasses!) shiftX = int(sg.shape[1] * 0.25) shiftY = int(sg.shape[0] * 0.35) y = max(0, y - shiftY) # add the sunglasses to the image output = overlay_image(image, sg, sgMask, (rightEyeCenter[0] - shiftX, y)) |
176
178
180
182
184
186
188
190
192
194
define N equally spaced steps between the top of the frame and the
steps = np.linspace(0, rightEyeCenter[1], config[“steps”],
for (i, y) in enumerate(steps):
# slighty to the left and slightly up – the reason why we are
# the center of our eye, translation helps us shift the
# what good are sunglasses!)
shiftY = int(sg.shape[0] * 0.35)
output = overlay_image(image, sg, sgMask,
Our sunglasses will drop down from the top of the image. Each frame, in turn, will show the sunglasses progressively getting closer to the face until they cover the eyes. Using our JSON configuration variable “steps” (the number of steps ), let’s generate evenly spaced y-values to place the sunglasses on each respective frame. This is handled on Lines 178 and 179 where we take advantage of NumPy’s linspace function effortlessly.
Given the steps , we’ll iterate over them (they are simply y-values) to compute the translation for the sunglasses.
Glancing at Lines 189 and 190, you might be thinking, “WTH?”
Referring to my code documentation comment on the preceding lines, I simply explain that we’re ensuring that the sunglasses cover each entire eye rather than just reaching the point at which the eye center is. I determined the percentage values to calculate both the x-shift and y-shift on Lines 189 and 190empirically. Line 191 is applied to ensure we do not have negative values.
Taking advantage of our overlay_image function, we generate our output frame on Lines 194 and 195.
Our final output frame is a special case as it as the “DEAL WITH IT” text which we’ll draw on by the frame by means of another masking operation:
| 197198199200201202203204205206207208209210211212213214215216217218219 | # if this is the final step then we need to add the “DEAL WITH # IT” text to the bottom of the frame if i == len(steps) - 1: # load both the “DEAL WITH IT” image and mask from disk, # ensuring we threshold the mask as we did for the sunglasses dwi = cv2.imread(config[“deal_with_it”]) dwiMask = cv2.imread(config[“deal_with_it_mask”]) dwiMask = cv2.cvtColor(dwiMask, cv2.COLOR_BGR2GRAY) dwiMask = cv2.threshold(dwiMask, 0, 255, cv2.THRESH_BINARY)[1] # resize both the text image and mask to be 80% the width of # the output image oW = int(W * 0.8) dwi = imutils.resize(dwi, width=oW) dwiMask = imutils.resize(dwiMask, width=oW, inter=cv2.INTER_NEAREST) # compute the coordinates of where the text will go on the # output image and then add the text to the image oX = int(W * 0.1) oY = int(H * 0.8) output = overlay_image(output, dwi, dwiMask, (oX, oY)) |
198
200
202
204
206
208
210
212
214
216
218
# IT” text to the bottom of the frame
# load both the “DEAL WITH IT” image and mask from disk,
dwi = cv2.imread(config[“deal_with_it”])
dwiMask = cv2.cvtColor(dwiMask, cv2.COLOR_BGR2GRAY)
cv2.THRESH_BINARY)[1]
# resize both the text image and mask to be 80% the width of
oW = int(W * 0.8)
dwiMask = imutils.resize(dwiMask, width=oW,
# output image and then add the text to the image
oY = int(H * 0.8)
If we’re on the last step (Line 199), we need to overlay our “DEAL WITH IT” image (Figure 5) — this is again a special case.
The “text� is actually another “image� here.
I opted to use an image since OpenCV’s font rendering capacities are quite limited, and furthermore, I wanted to add a drop shadow and border to the text which again, is something OpenCV cannot do.
The rest of the above code block loads both the image and mask and then proceeds to perform alpha blending in order to generate the final frame output.
And now we just need to output each frame to disk followed by creating our GIF:
| 221222223224225226227228229230231232233234 | # write the output image to our temporary directory p = os.path.sep.join([config[“temp_dir”], “{}.jpg”.format( str(i).zfill(8))]) cv2.imwrite(p, output) # now that all of our frames have been written to disk we can finally# create our output GIF imageprint(“[INFO] creating GIF…“)create_gif(config[“temp_dir”], args[“output”], config[“delay”], config[“final_delay”], config[“loop”]) # cleanup by deleting our temporary directoryprint(“[INFO] cleaning up…“)shutil.rmtree(config[“temp_dir”], ignore_errors=True) |
222
224
226
228
230
232
234
p = os.path.sep.join([config[“temp_dir”], “{}.jpg”.format(
cv2.imwrite(p, output)
now that all of our frames have been written to disk we can finally
print(“[INFO] creating GIF…”)
config[“final_delay”], config[“loop”])
cleanup by deleting our temporary directory
shutil.rmtree(config[“temp_dir”], ignore_errors=True)
On Lines 222-224 we write the loop’s output frame to disk.
Once all frames have been generated, we call our create_gif function to generate the GIF animation file (Lines 229 and 230). Remember, the create_gif function is a wrapper that passes parameters to ImageMagick’s convert command line tool.
Finally, we clean up by deleting the temporary output directory + individual image files.
OpenCV GIF Results
Now for the fun part — let’s take a look at what our meme generator created!
Make sure you use the “Downloads� section of this blog post to download the source code, example images, and deep learning models. From there, open up your terminal and execute the following command:
| $ python create_gif.py –config config.json –image images/adrian.jpg \ –output adrian_out.gif[INFO] loading models…[INFO] computing object detections…[INFO] creating GIF…[INFO] cleaning up… |
–output adrian_out.gif
[INFO] computing object detections…
[INFO] cleaning up…
 Figure 9: Generating GIFs with OpenCV and ImageMagick is easy with today’s Python script.
Here you can see a GIF created with OpenCV and ImageMagick showing that:
-
My face has been correctly detected.
-
My eyes have been localized and their centers computed.
-
The sunglasses are correctly lowered down across my face.
Many of you know that I’m a huge Jurassic Park nerd and often include Jurassic Park references inside my books, courses, and tutorials.
Don’t like Jurassic Park?
Well, here’s my response:
| $ python create_gif.py –config config.json –image images/adrian_jp.jpg \ –output adrian_jp_out.gif[INFO] loading models…[INFO] computing object detections…[INFO] creating GIF…[INFO] cleaning up… |
–output adrian_jp_out.gif
[INFO] computing object detections…
[INFO] cleaning up…
 Figure 10: A GIF made with OpenCV of me at the recent Jurassic* Park: Fallen Kingdom* movie showing.
Here I am at the opening of Jurassic Park: Fallen Kingdom sporting my special Jurassic Park shirt, pint glass, and collectors edition book.
Fun story:
Five or six years ago my now wife and I visited EPCOT Center in Walt Disney World in Orlando, FL.
We decided to take the trip to get away from the harsh Connecticut winters — we were in desperate need of sunlight.
Unfortunately, it rained the entire time we in FL and the weather barely exceeded 50F degrees.
Trisha took the following photo of me outside of the “Canadian gardensâ€� at Epcot — she says I look like I vampire with my pale skin, dark clothes, and hood up, in contrast to the lush gardens behind me:
| $ python create_gif.py –config config.json –image images/vampire.jpg \ –output vampire_out.gif[INFO] loading models…[INFO] computing object detections…[INFO] creating GIF…[INFO] cleaning up… |
–output vampire_out.gif
[INFO] computing object detections…
[INFO] cleaning up…
Figure 11: You can create a “Deal with it” GIF or another type of GIF using OpenCV and Python.
Trisha decided to post the photo on social media later that evening — I was left to deal with it.
For those of you that attended PyImageConf 2018 (read the recap here), you know that I’m always one for a joke. Here’s a good joke:
Q: Why did the rooster cross the road?
Creating GIFs with OpenCV
| $ python create_gif.py –config config.json –image images/rooster.jpg \ –output rooster_out.gif[INFO] loading models…[INFO] computing object detections…[INFO] creating GIF…[INFO] cleaning up… |
–output rooster_out.gif
[INFO] computing object detections…
[INFO] cleaning up…
 Figure 12: Even in low contrast, my face is detected and my sunglasses are put on by OpenCV, making for an excellent “Deal With It” meme/GIF.
A: I’m not telling you the answer — deal with it.
Finally, let’s wrap up today’s tutorial on creating GIFs with OpenCV with a good-hearted meme.
Approximately six years ago my dad and I adopted the family beagle, Jemma.
Here you can see tiny Jemma puppy sitting on my shoulder:
| $ python create_gif.py –config config.json –image images/pupper.jpg \ –output pupper_out.gif[INFO] loading models…[INFO] computing object detections…[INFO] creating GIF…[INFO] cleaning up… |
–output pupper_out.gif
[INFO] computing object detections…
[INFO] cleaning up…
 Figure 13: Jemma is adorable. Don’t think so? Then “Deal With It!” This GIF was made with OpenCV and Python.
Don’t think she’s a cute puppy? Deal with it.
Did you encounter an AttributeError?
Not to worry!
If you saw the following error:
| $ python create_gif.py –config config.json –image images/adrian.jpg \ –output adrian_out.gif…Traceback (most recent call last): File “create_gif.py”, line 142, in |
–output adrian_out.gif
Traceback (most recent call last):
(lStart, lEnd) = face_utils.FACIAL_LANDMARKS_IDXS[“left_eye”]
Then you just need to upgrade the imutils package:
| $ pip install –upgrade imutilsCollecting imutils…Successfully installed imutils-0.5.1 |
Collecting imutils
Successfully installed imutils-0.5.1
Why, you ask?
By default imutils.face_utils will use the 68-point landmark detector built into dlib (as does this blog post). There is also a faster dlib 5-point landmark detector that now works with imutils as well. I recently updated imutils to support both (which is the reason why you may see the error).
Summary
In today’s tutorial, you learned how to create GIFs using OpenCV.
To keep the post lighthearted and fun, we learned how to use OpenCV to generate GIFs of the “Deal With It� meme, a popular meme (and also my personal favorite) that can be found in some capacity on nearly every social media website.
In order to build our meme generator, we leveraged computer vision and deep learning in a number of practical ways, including:
-
Face detection
-
Facial landmark prediction
-
Extracting regions of the face (in this case, the eyes)
-
Computing the angle between the eyes, a requirement for face alignment
-
Generating transparent overlays via alpha blending
Finally, we took our set of generated images and then created an animated GIF using OpenCV and ImageMagick.
I hope you enjoyed today’s tutorial on GIF creation with OpenCV!
If you enjoyed it, please do leave a comment and let me know.
And if you didn’t enjoy the tutorial, whatever, deal with it 😉
To download the source code to today’s post, and be notified when future tutorials are published here on PyImageSearch,* just enter your email address in the form below!*