Here are the rules: if you read this post all the way through, you have to deploy a smart contract on your private Ethereum blockchain yourself. I give you all the code I used here in Github so you have no excuses not to.
But if you don’t follow the rules and you only want to read, hopefully this helps give a perspective of starting with nothing and ending with a blockchain app.
By the end, you’ll have started a local private Ethereum blockchain, connected two different nodes as peers, written and compiled a smart contract, and have a web interface that allows users to ask questions, deploy the questions on the blockchain, and then lets the users answer.
If you’re confused, run into an error, or want to say something else, go ahead an write a comment, get in contact, or say something on Twitter.
Oh, and here’s the Github repo, so go ahead and fork it (if you don’t want to copy paste all the code here) and then if you make updates you want to share, I’ll throw this in the README.
Private Blockchain Creation
To create a single node, we need the following genesis.json, which represents the initial block on the private blockchain.
If you want a somewhat full explanation of the fields, look at this Stack Overflow answer. The big ones in our case here are difficulty being low, because we don’t want to have to wait long for blocks to be mined on our test network, and then gasLimit being high to allow the amount of work that can be done by a node in the block to be able to process every transaction.
Go ahead and open a terminal, make sure geth is installed in whatever way works for your OS, and then cd into the folder that you have your genesis.json file saved. Running run the following command will initialize the blockchain for this node.
$ geth --datadir "/Users/USERNAME/Library/PrivEth" init genesis.json
–datadir specifies where we want the all the data for the blockchain to be located. On a mac, the default is ~/Library/Ethereum. Since we have multiple nodes running, we can’t have them sharing the same data folder, so we’re going to specify. Linux and Windows machines have different default datadirs, so take a look at those to see in general where they should be located.
After running this init command with the genesis.json file we want to use, go checkout that --datadir directory. You’ll see a bunch of files, so feel free to poke around. Not necessary right now, but you’ll want to look around there eventually.
For this to be a blockchain, we need more than one node. For blockchains to become peers, we need them to have the same genesis file. So we’re going to run the same command as above, from the same directory, but this time with a different datadir.
geth --datadir "/Users/USERNAME/Library/PrivEth2" init genesis.json
With all the code here, we’re going to be working in the same directory. The code is the same, but with the command line options, we’ll be able to separate these processes by the command line arguments.

Initializing the chain for both nodes.
When running geth with a different --datadir, you’ll be running separate nodes no matter where you ran the command from. Just remember to specify the --datadir each time so it doesn’t fall back to default. Also note that I changed the names for these datadirs, so watch out if you see different names in the screenshots.
Opening the Consoles
So far, we’ve done three things. 1) Created a genesis.json file in a working directory of your choosing, 2) picked a directory to store the blockchain for one node and initialized the first block, and 3) picked a different directory to store the blockchain for the other node. Very little code and a few commands.
The next step to be able to log into the geth console for each node. The console will start the geth process and run it, but also give us a way to run some web3 commands in the terminal.
There are a couple more options here.
–networkid is similar to in the genesis.json file, where all we want here is to make sure we’re not using network ids 1-4.
–port specifies which port our .ipc file will be using. That’s the way we’ll connect with the database using the web3.js library. The default port is 30303, so we’ll keep it in that area, but this is our first node, so 30301 it is.
–nodiscover tells geth to not look for peers initially. This is actually important in our case. This is a private network. We don’t want nodes to try to connect to other nodes without me specifying, and we don’t want these nodes to be discovered without us telling them.
With the first geth node running, run the same command in a different terminal with the second --datadir and and different --port you’ll have nodes running.

Starting the consoles.
Creating Initial Coinbase Account for Each Node
When you have the console running from the command above, we want to create our main coinbase account. If you’re curious, I used the passphrase ‘passphrase’. You’ll see we need that in our Node app down the road.
Run the same commands in the other node’s console as well.

Create that new account.
Since this is the first account this node has created, you’ll see it’s also listed in
Another piece of information you can grab on the console is by running
There you’ll see more information about the accounts instead of only the address. You’ll also see where that account information is stored, and it’ll be in the --datadir you specified. So if you’re still curious how the data is stored in your filesystem, go checkout the directory now.
Connecting Nodes as Peers
We have multiple nodes running, and we’ll need to connect them as peers. First we’ll check to see if we have peers.
So sad. This is what we expected where we started the console on a non 1-4 network id and the nodiscover flag. This means that we need to tell each node to connect to the other node with a specific command. The way we do this is by sharing the enode address.
This is the enode information that geth uses to connect to different nodes where they’re able to share information about transactions and successful mining.
To connect the nodes using this url, we want to call the function addPeer.
If we copy the return value of the admin.nodeInfo.enode from one of the nodes, run the following command in the other node.
This tells one node how to get to the other node, will ask the other node to link up, and they’ll both become each other’s peers. To check, run the admin.peers command on both nodes and you’ll see they’re together. Something like:
To add the peer, you only need to tell one node to connect to the other node so check the other node and you’ll see output like this.

Peers on peers.
Checking Balances and Mining
Now that the nodes are connected, we’re not in the realm of money. Before we mine, we want to check the balances of our main account.
Again, so sad. Since we didn’t allocate ethers to this account on the genesis block, we need to start mining to get some for these accounts.
When in the console, we run miner.start() for the node to start mining, and then miner.stop() for it to stop. When mining, not only are we looking to see how many ethers the accounts get, we also want to watch the interaction of two nodes that are peers.
In the picture below, you’ll see I checked the balance of each main accounts for both nodes. Then on node 1, I started the mining, let it run for ~5 seconds, and then stopped the mining after 7 full blocks. I check the balance on that side and have 35 ether, where the number in the console represents Wei. On the other node, you’ll see that it received information of the 7 blocks that were mined from node 1.

Beginning to mine.
Transactions
Working with smart contracts requires special transactions, but before getting that far, we want to know how to create transactions that send ether to the other account.
On one node, let’s take the coinbase account and unlock it.
Now copy the address from the other node’s coinbase account, and back in the node with the unlocked account,
After this, the sendTransaction command is somewhat simple.
One other thing to note, and something that you’ll be decently confused with a lot, is why these numbers for value are huge in terms of zeros. This is because values are represented in Wei, so we don’t have to deal with floating point numbers which could cause issues on different systems. This will come into play with gas that we’ll need to start specifying for contract deployment and transactions.
If you’re wondering how few ether we’re sending with that value,
To get the transaction to send, and to see the difference in balances, we need to start the miner in a node, and then stop it after a block is mined. Now check the balances to see the change
Alright, check out this giant picture below. Again, node 1 is on the left, node 2 on the right. So I first check balances for each coinbase account on each node. The on node 1, I copy node 2’s address, send the transaction, and then logging from the node that it has received a submitted transaction. Then I start the mining. You’ll see that node 8 has txs=1 meaning it’s mined a transaction into that block. After a few more blocks, I stop the mining. I check the balance of node 1’s account. We have 12 blocks with rewards of 5 ether each, but then gave away 100000000 Wei.
Now, I go back to node 2, check the balance of its coinbase account and see that it’s 0. Then I remembered I restarted the console for node 1 and didn’t set the two nodes back as peers. So I print the enode of node 1, add that as a peer for node 2. You’ll see right after adding the peer, node 2 receives the blocks it missed, including 1 transaction. Then I check the balance again and it knows it has 100000000 Wei.
![]()
This is how to send ether locally.
Intermission
At this point, we’re about half done! We’ve worked in a terminal having a private Ethereum blockchain running locally, two nodes that have accounts, are peers with each other, and can send transactions back and forth.
That’s pretty good, so if you want to take a second to calm down and get a slightly better understanding, go ahead. But at some point, we want to move on.
Write a Contract on Remix
Moving on! With the geth nodes running, the next step is getting into contracts.
When writing posts like this, it takes a long time to pick a simple yet worthwhile example. And that was the case for me when trying to pick a type of contract to use. The one I decided to throw in here is one where people are able to answer yes / no, or true / false questions.
The final v1 code for the Solidity contract is below. A few notes before you look at it.
-
We’re just using global variables in this case for the question, who asked it, who has answered it, and the values for the answers. Solidity also has structs where we could store the data, but we’re talking about deployment and not Solidity, so not going too in depth with that.
-
I’m using
uints to store the yes / no answers instead ofbools. In Solidity, if I have a mapping that links addresses to abool, the default is FALSE. For auint, the default is zero. This lets us have the three states we need. I could have used anenumhere, but like I said, we’re staying simple. -
The answerQuestion method is somewhat complicated in the logic and all the if statements. Go through it if you want to get a sense of how we’re adjusting the variables.
-
We have a get function that returns all the information we want to show the status of the contract on the page. We could split it up to return different information separately, but might as well throw it together to not have to make multiple queries.
-
Not only are there other ways to store this data in the contract, there are tons of other ways to write this! For example we could have a list of all the accounts that voted true or false and then loop through those to see if they’ve answered yet.
I store this contract in contracts/Question.sol, but instead of doing the compiling locally, I use Remix which handles a bunch of things, in terms of tons of errors and warnings of the code, as well as compiling the required information.
To see the compiling information, on the upper right “compile” tab, click the details button and you’ll see a bunch of information pop up. The data we’re looking for is the byteCode and ABI. Right below that is the web3 deploy information which is exactly what we’re going to mimic! But rather than having giant strings on a single line, we’re going to import the information from a json file. Gotta keep that data separate.
Go ahead and straight copy this file, but I’d say go to Remix and work with the compiler they have there so you can get a feel for that as well. Quick thing to mention is for the byteCode, you need to make sure that string starts with “0x”. When you copy the byte code field from Remix you only get the numbers.
NodeJS Time
From above, every time I said node, I meant the geth / blockchain node. Here, we’ll be seeing the word “node” again, but when you see the capital N, we mean NodeJS.
We have the v1 contract compiled and stored in a file. Now we need to get a Node instance running. There are four endpoints we’re going to have.
-
GET ‘/’ which will have a form to ask a new question,
-
POST ‘/questions/new’ which deploys the new question contract on the blockchain,
-
GET ‘/questions?address=0xXXXX…’ which will show the question with the current answers and a form to send or update your answer, and
-
POST ‘/questions?address=0xXXXX…’ which handles the answering.
Deploying Question
Preface, before going into blockchains I hadn’t used Node in forever, so some of the syntax and practices might be off here. For the code, I’ll go through the three endpoints that talk to the blockchain. The first is a post request to deploy a new question. I threw the code that’s needed to connect to your locally running geth as well.
}).send({from: coinbaseAddress, gas: 2000000})
.on(‘receipt’, function (receipt) {
console.log(“Contract Address: “ + receipt.contractAddress);
res.redirect(‘/questions?address=’ + receipt.contractAddress);
});
});
});
When we hit the endpoint, the first step, after grabbing the request from the body, is to unlock the account that we’re deploying from. This is necessary so we’re not impersonating someone else. Once we get the callback, we’re going to deploy the contract where the data of the transaction is the entire byteCode, and then we pass in the question string for the init function in the contract. We specify we’re sending it from the coinbase address, and saying that we’re investing 2000000 Wei (which is 0.000000000002 ether if you’re wondering how small it is).
There are more than a few callbacks we can use here, but the only one we’re interested in right now is the ‘receipt’, where we’re given the contract’s address after it’s been mined. In terms of UI, the way this is written is that the page will hang, waiting for the contract to be mined, before redirecting to the question’s page. This probably isn’t a good idea at all for a wide use DAPP because mining blocks on the public Ethereum averages ~14.5 seconds. But here on our private blockchain, we set the difficulty to be so low that blocks are mined very quickly, so it isn’t an issue.
Viewing Question
Now that we have a question that exists, we want to go ahead and view it! We use the web3.utils.isAddress function to verify that the address is not only a valid hex string, but also verifies that the check sum is valid which makes sure it’s an existing address.
Then our getQuestion method returns a result that’s a dictionary of the return values. In our case, that’s the question, the number of trues, number of falses, and also whether or not the person running the node has answered the question yet.
Answering the Question
When we post to that question url, we go through much of the same process of validating the input, validating the address, and then calling the answerQuestion method with the required parameters. Along with the question creation function, we’re going to have the browser hang until the block with the update transaction is mined.
HTML
As for the HTML, I’m not going to bother posting it here because it’s quite simple. I didn’t bother to use a css template because it doesn’t matter in a backend post like this. You’ll see screenshots of the basic interface below while I talk about running the code.
Running The Code
Now all the code is out there. You have four tabs on the console open. Two are running geth
and the other two are running the Node apps, connected to separate geth processes, and running on different localhost ports. I added config files, named them primary and secondary to point to the ipc and port that Node should run on.
I threw in some pictures here so people reading can know more about what I’m seeing on my screen. On that, lets go to the browser and start interacting. First up is going to the home page where you can ask a question.
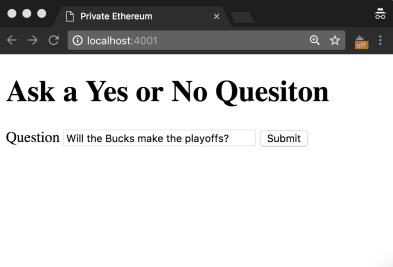
Will they??
Then when you hit the submit button, you’ll see the logging from the Node app, in the geth console you’ll start the miner and then stop it after the block with this transaction is complete.

Almost time to answer.
To answer, you’ll submit the form, then start and stop the mining. When you’re doing this yourself, a fun thing to do is start the miner before submitting the answer form so you can get a sense of how quickly blocks are mined with this small level of difficulty defined in the genesis block.
Check out the terminal below. In the top Node terminal you’ll see some logging about validating the address, and then logging when we’re redirected to the same page but with updated information. In the geth console, you can see when the transaction was submitted, along with which block the transaction was mined on.
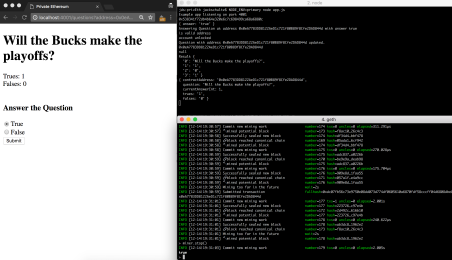
Obviously they will.
Now that we answered the question from the primary node, let’s check out the secondary one.
On the right side of the picture, you’ll see the top two terminals showing the Node and geth interactions, and then on the bottom is the primary geth which you can see that it received blocks with a transaction in it because the two geth nodes are peers. After the question was answered by the node on port 4002, I reloaded the page on port 4001 and we can see the result.
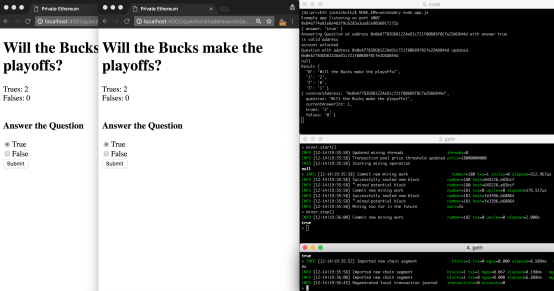
Of course they will.
Just to show that we can switch back to false, I changed the answer from port 4002 to false (which is wrong, cause the Bucks are definitely going to make the playoffs), and then you can see the console logging the information of what went through.

I changed my answer back to true after taking this screenshot.
Conclusion
If you’ve gotten this far and have the code running yourself, big cong. Like most of these posts, this is much longer than I had initially imagined it being. The goal with this is to go through and explain all the steps of a smart contract rather than somewhere in the middle.
Like above, if you have feedback of any kind, get in touch — comments, contact, or twitter.
Like this:
Like Loading…
Related