This is an introductory tutorial on using Theano, the Python library. I’m going to start from scratch and assume no previous knowledge of Theano. However, understanding how neural networks work will be useful when getting to the code examples towards the end.
The plan for the tutorial is as follows:
-
Give a basic introduction to Theano and explain the important concepts.
-
Go over the main operations that we have available in Theano.
-
Look at working code examples.
I recently gave this tutorial as a talk in University of Cambridge and it turned out to be way more popular than expected. In order to give more people access to the material, I’m now writing it up as a blog post.
I do not claim to know everything about Theano, and I constantly learn new things myself. If you find any errors or have suggestions on how to improve this tutorial, do let me know.
The code examples can be found in the Github repository: https://github.com/marekrei/theano-tutorial
1. What is Theano?
Theano is a Python library for efficiently handling mathematical expressions involving multi-dimensional arrays (also known as tensors). It is a common choice for implementing neural network models. Theano has been developed in University of Montreal, in a group led by Yoshua Bengio, since 2008.
Some of the features include:
-
automatic differentiation – you only have to implement the forward (prediction) part of the model, and Theano will automatically figure out how to calculate the gradients at various points, allowing you to perform gradient descent for model training.
-
transparent use of a GPU – you can write the same code and run it either on CPU or GPU. More specifically, Theano will figure out which parts of the computation should be moved to the GPU.
-
speed and stability optimisations – Theano will internally reorganise and optimise your computations, in order to make them run faster and be more numerically stable. It will also try to compile some operations into C code, in order to speed up the computation.
Technically, Theano isn’t actually a machine learning library, as it doesn’t provide you with pre-built models that you can train on your dataset. Instead, it is a mathematical library that provides you with tools to build your own machine learning models. But if you are looking for machine learning toolkits, there are several good ones implemented on top of Theano:
2. Python refresher
Theano is a Python library, so let’s go over some important points in Python.
-
Python is an interpreted language, which makes it more platform independent but generally slower than C, for example.
-
Python uses dynamic typing. While each variable does have a specific type during execution, these are not explicitly stated in the code.
Python uses indentation for block delimiting. So where C or Java would use curly brackets to separate a block, Python uses whitespace. Here we define a function f to take parameter x and return 2x: def f(x): return 2x
We define a list in Python with square brackets: a = [1,2,3,4,5] a[1] == 2
We define a dictionary (key-value mapping) with curly brackets: b = {‘key1’: 1, ‘key2’:2} b[‘key2’] == 2
List comprehension is a neat shorthand in Python for constructing lists. Here we loop for 5 steps (values 0-4), and each time add i+1 to the list:
c = [i+1 for i in range(5)] c[1] == 2
3. Using Theano
In order to use Theano, you will need to install the dependencies and install Theano itself. If you’re using Ubuntu (tested for 14.04), you might get away with just running these two commands:
If that doesn’t work for you, take a look at the original Theano homepage, which contains instructions for various platforms:http://deeplearning.net/software/theano/install.html
To use Theano in your Python script, include it using:
4. Minimal Working Example
Here is the smallest example I could come up with, which uses Theano and actually does something:
So what’s happening here?
We first define a Theano variable x to be a vector of 32-bit floats, and give it name ‘x’:
Next, we create a Theano variable W, assign its value to be vector [0.2, 0.7], and name it ‘W’:
We define y to be the sum of all elements in the element-wise multiplication of x and W:
We define a Theano function f, which takes as input x and outputs y:
Then call this function, giving as the argument vector [1.0, 1.0], essentially setting the value of variable x:
The script prints out the summed product of [0.2, 0.7] and [1.0, 1.0], which is:
Don’t worry if the code doesn’t fully make sense. We’ll go over the important parts in more detail.
5. Symbolic graphs in Theano (!)
I’d say this section contains the most crucial part to understanding Theano.
When we are creating a model with Theano, we first define a symbolic graph of all variables and operations that need to be performed. And then we can apply this graph on specific inputs to get outputs.
For example, what do you think happens when this line of Theano code is executed in our script?
The system takes x and W, multiplies them together and sums the values. Right?
NOPE
Instead, we create a Theano object y that knows its values can be calculated as the dot-product of x and W. But the required mathematical operations are not performed here. In fact, when this line was executed in our example code above, x didn’t even have a value yet.
By chaining up various operations, we are creating a graph of all the variables and functions that need to be used to reach the output values. This symbolic graph is also the reason why we can only use Theano-specific operations when defining our models. If we tried to integrate functions from some random Python library into our network, they would attempt to perform the calculations immediately, instead of returning a Theano variable as needed. Exceptions do exist – Theano overrides some basic Python operators to act as expected, and NumPy is quite well integrated with Theano.
6. Variables
We can define variables which don’t have any values yet. Normally, these would be used for inputs to our network.
The variables have to be of a specific type though. For example, here we define variable x to be a vector of 32-bit floats, and give it name ‘x’:
The names are generally useful for debugging and informative error messages. Theano won’t have access to your Python variable names, so you have to assign explicit Theano names for each variable if you want them to be referred to as something more useful than just “a tensor”.
There are a number of different variable types available, just have a look at the list here. Some of the more popular ones include:
| Constructor | dtype | ndim |
|---|---|---|
| fvector | float32 | 1 |
| ivector | int32 | 1 |
| fscalar | float32 | 0 |
| fmatrix | float32 | 2 |
| ftensor3 | float32 | 3 |
| dtensor3 | float64 | 3 |
You can also define a generic vector (or tensor) and set the type with an argument:
If you don’t set the dtype, you will create vectors of type config.floatX. This will become relevant in the section about GPUs.
7. Shared variables
We can also define shared variables, which are shared between different functions and different function calls. Normally, these would be used for weights in our neural network. Theano will automatically try to move shared variables to the GPU, provided one is available, in order to speed up computation.
Here we define a shared variable and set its value to [0.2, 0.7].
The values in shared variables can be accessed and modified outside of our Theano functions using these commands:
8. Functions
Theano functions are basically hooks for interacting with the symbolic graph. Commonly, we use them for passing input into our network and collecting the resulting output.
Here we define a Theano function f that takes x as input and returns y as output:
The first parameter is the list of input variables, and the second parameter is the list of output variables. Although if there’s only one output variable (like now) we don’t need to make it into a list.
When we construct a function, Theano takes over and performs some of its own magic. It builds the computational graph and optimises it as much as possible. It restructures mathematical operations to make them faster and more stable, compiles some parts to C, moves some tensors to the GPU, etc.
Theano compilation can be controlled by setting the value of mode in the environement variable THEANO_FLAGS:
-
FAST_COMPILE – Fast to compile, slow to run. Python implementations only, minimal graph optimisation.
-
FAST_RUN – Slow to compile, fast to run. C implementations where available, full range of optimisations
9. Minimal Training Example
Here’s a minimal script for actually training something in Theano. We will be training the weights in W using gradient descent, so that the result from the model would be 20 instead of the original 0.9.
We create a second input variable called target, which will act as the target value we use for training:
In order to train the model, we need a cost function. Here we use a simple squared distance from the target:
Next, we want to calculate the partial gradients for the parameters that will be updated, with respect to the cost function. Luckily, Theano will do that for us. We simply call the grad function, pass in the real-valued cost and a list of all the variables we want gradients for, and it will return a list of those gradients:
Now let’s define a symbolic variable for what the updated version of the parameters will look like. Using gradient descent, the update rule is to subtract the gradient, multiplied by the learning rate:
And next we create a list of updates. More specifically, a list of tuples where the first element is the variable we want to update, and the second element is a variable containing the values that we want the first variable to contain after the update. This is just a syntax that Theano requires.
Have to define a Theano function again, with a couple of changes:
It now takes two input arguments – one for the input vector, and another for the target value used for training. And the list of updates also gets attached to the function as well. Every time this function is called, we pass in values for x and target, get back the value for y as output, and Theano performs all the updates in the update list.
In order to train the parameters, we repeatedly call this function (10 times in this case). Normally, we’d pass in different examples from our training data, but for this example we use the same x=[1.0, 1.0] and target=20 each time:
When the script is executed, the output looks like this:
The first time the function is called, the output value is still 0.9 (like in the previous example), because the updates have not been applied yet. But with each consecutive step, the output value becomes closer and closer to the desired target 20.
10. Useful operations
This covers the basic logic behind building models with Theano. The example was very simple, but we are free to define increasingly complicated networks, as long as we use Theano-specific functions. Now let’s look at some of these building blocks that we have available.
Evaluate the value of a Theano variable
The eval() function forces the Theano variable to calculate and return its actual (numerical) value. If we try to just print the variable a, we only print its name. But if we use eval(), we get the actual square matrix that it is initialised to.
This eval() function isn’t really used for building models, but it can be useful for debugging and learning how Theano works. In the examples below, I will be using the matrix a and the eval() function to print the value of each variable and demonstrate how different operations work.
Basic element-wise operations: + – * /
Dot product
Activation functions
Softmax (row-wise)
Sum
Max
Argmax
Reshape
We sometimes need to change the dimensions of a tensor and reshape() allows us to do that. It takes as input a tuple containing the new shape and returns a new tensor with that shape. In the first example below, we shape a square matrix into a 1×4 matrix. In the second example, we use -1 which means “as big as the dimension needs to be”.
Zeros-like, ones-like
These functions create new tensors with the same shape but all values set to zero or one.
Reorder the tensor dimensions
Sometimes we need to reorder the dimensions in a tensor. In the examples below, the dimensions in a two-dimensional matrix are first swapped. Then, ‘x’ is used to create a brand new dimension.
Indexing
Using Python indexing tricks can make life so much easier. In the example below, we make a separate list b containing line numbers, and use it to construct a new matrix which contains exactly the lines we want from the original matrix. This can be useful when dealing with word embeddings – we can put word ids into a list and use this to retrieve exactly the correct sequence of embeddings from the whole embedding matrix.
For assignment, we can’t do this:
But instead, we can use set_subtensor(), which takes as arguments the selection of the original matrix that we want to reassign, and the value we want to assign it to. It returns a new tensor that has the corresponding values modified.
11. Classifier Code Example
At this point, it’s time to move on to some more realistic examples.
Take a look at the code for a very basic classifier, which tries to train a small network on a tiny (but real) dataset. I won’t walk you through it line-by-line any more; you’ve learned all the necessary parts by now and there are comments in the code as well.
The task is to predict whether the GDP per capita for a country is more than the average GDP, based on the following features:
-
Population density (per suqare km)
-
Population growth rate (%)
-
Urban population (%)
-
Life expectancy at birth (years)
-
Fertility rate (births per woman)
-
Infant mortality (deaths per 1000 births)
-
Enrolment in tertiary education (%)
-
Unemployment (%)
-
Estimated control of corruption (score)
-
Estimated government effectiveness (score)
-
Internet users (per 100 people)
The data/ directory contains the files for training (121 countries) and testing (40 countries). Each row represents one country, the first column is the label, followed by the features. The feature values have been normalised, by subtracting the mean and dividing by the standard deviation. The label is 1 if the GDP is more than average, and 0 otherwise.
Once you clone the github repository (or just download the data files), you can run the script with:
The script will print information about 10 training epochs and the result on the test set:
12. Recurrent functions with scan
One more important operation to cover is scan, which can be used to create various recurrent functions: RNN, GRU, LSTM, etc.
Here is sample code for using scan to define a simple RNN over word vectors in the input_vectors matrix:
The scan function is called on line 10 and it takes 4 important arguments:
-
fn: The function that is called at every step of the iteration.
-
sequences: The variables that we want to iterate over. If this is a matrix, we will be iterating over each row of that matrix.
-
outputs_info: The values that we use as the previous recurrent values for the very first step. Usually these are just set to 0.
-
non_sequences: Any additional variables that we want to pass into the function (fn) but don’t want to iterate over.
We’ve defined the helper function rnn_step on line 1, which gets called on each row of our input matrix. The scan function will be calling this rnn_step function internally, so we need to accept any arguments in the same order as Theano passes them. This is just something you need to know when dealing with scan. The order is as follows:
-
First, the current items from the variables that we are iterating over. If we are iterating over a matrix, the current row is passed to the function.
-
Next, anything that was output from the function at the previous time step. This is what we use to build recursive and recurrent representations. At the very first time step, the values will be those from outputs_info instead.
-
Finally, anything we specified in non_sequences.
What comes out from the scan function contains the hidden states (eg the rnn_step outputs) at each step. Not just the last step, but all of them. So if you only want the last step, you need to explicitly retrieve it by indexing from -1 (the last element). Theano is actually smart enough to figure out that you’re only using the last result, and will optimise to discard all the intermediate ones.
In order to construct the weight matrices, I’m using a helper function (self.create_parameter_matrix, definition not shown here) which takes as input the variable name and the shape. This means I don’t need to define the weight initialisation part again each time.
13. RNN Classifier Code Example
Time to look at some more code, this time using recurrent functions and scan. The script is available at the Github repository. In this example, I’m using Gated Recurrent Units (GRU) from “Learning Phrase Representations using RNN Encoder-Decoder for Statistical Machine Translation” (Cho et al, 2014), which are essentially a simpler versions of LSTMs.
The task is to classify sentences into 5 classes, based on their fine-grained sentiment (very negative, slightly negative, neutral, slightly positive, very positive). We use the dataset published in “Recursive Deep Models for Semantic Compositionality Over a Sentiment Treebank” (Socher et al., 2013).
Start by downloading the dataset from http://nlp.stanford.edu/sentiment/ (the main zip file) and unpack it somewhere. Then, create training and test splits in the format that is more suitable for us, using the provided script in the repository:
Now we can run the classifier with:
The script will train for 3 passes over the training data, and will then print performance on the test data.
The accuracy on the test set is about 38%, which isn’t a great result. But it is quite a difficult task – the current state-of-the-art system (Tai ei al., 2015) achieves 50.9% accuracy, using a large amount of additional phrase-level annotations, and a much bigger network based on LSTMs and parse trees. As there are 5 classes to choose from, a random system would get 20% accuracy.
14. Running on a GPU
Theano is smart enough to move some parts of the processing to the GPU, as long as CUDA is installed and a graphics card is made available. To install CUDA, follow instructions on one of these links:
https://developer.nvidia.com/cuda-downloadshttp://www.r-tutor.com/gpu-computing/cuda-installation/cuda7.5-ubuntu
Then, when running your Python script, you need to point Theano to the CUDA installation. I do this by setting the environment variables in the command line:
This command is for CUDA-7.5 in my system. You’ll need to make sure that the paths match the CUDA installation paths in your machine. If it works and Theano is using a GPU, the first line that gets printed will explicitly say so. Something like this:
If you don’t get something similar, it probably means Theano is not properly hooked up to use the GPU.
At the time of writing, Theano only supports 32-bit variables on the GPU, and this is where the floatX=float32 setting comes it. It just allows you to set the data type during the execution of the script, without writing it into your code. For example, you can define your vectors like this:
And now you can set floatX to be float32 when running the script on a GPU and float64 when running on your CPU.
Finally, if your machine has multiple GPUs, you can control which one is used for the script by setting device=gpu0, device=gpu1, etc. Based on personal experience, running multiple Theano jobs on the same GPU does not give any advantage, so it’s best to send them to different ones when possible.
15. Drawing the computation graph
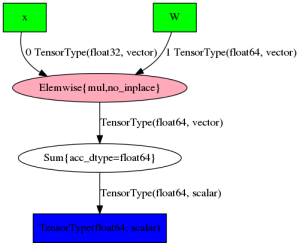
Theano provides a command for printing a variable or a function, along with all the required computation, as an image:
When dealing with very simple models, this can give a nice graphical representation. For example, here is a model from our minimal working example:
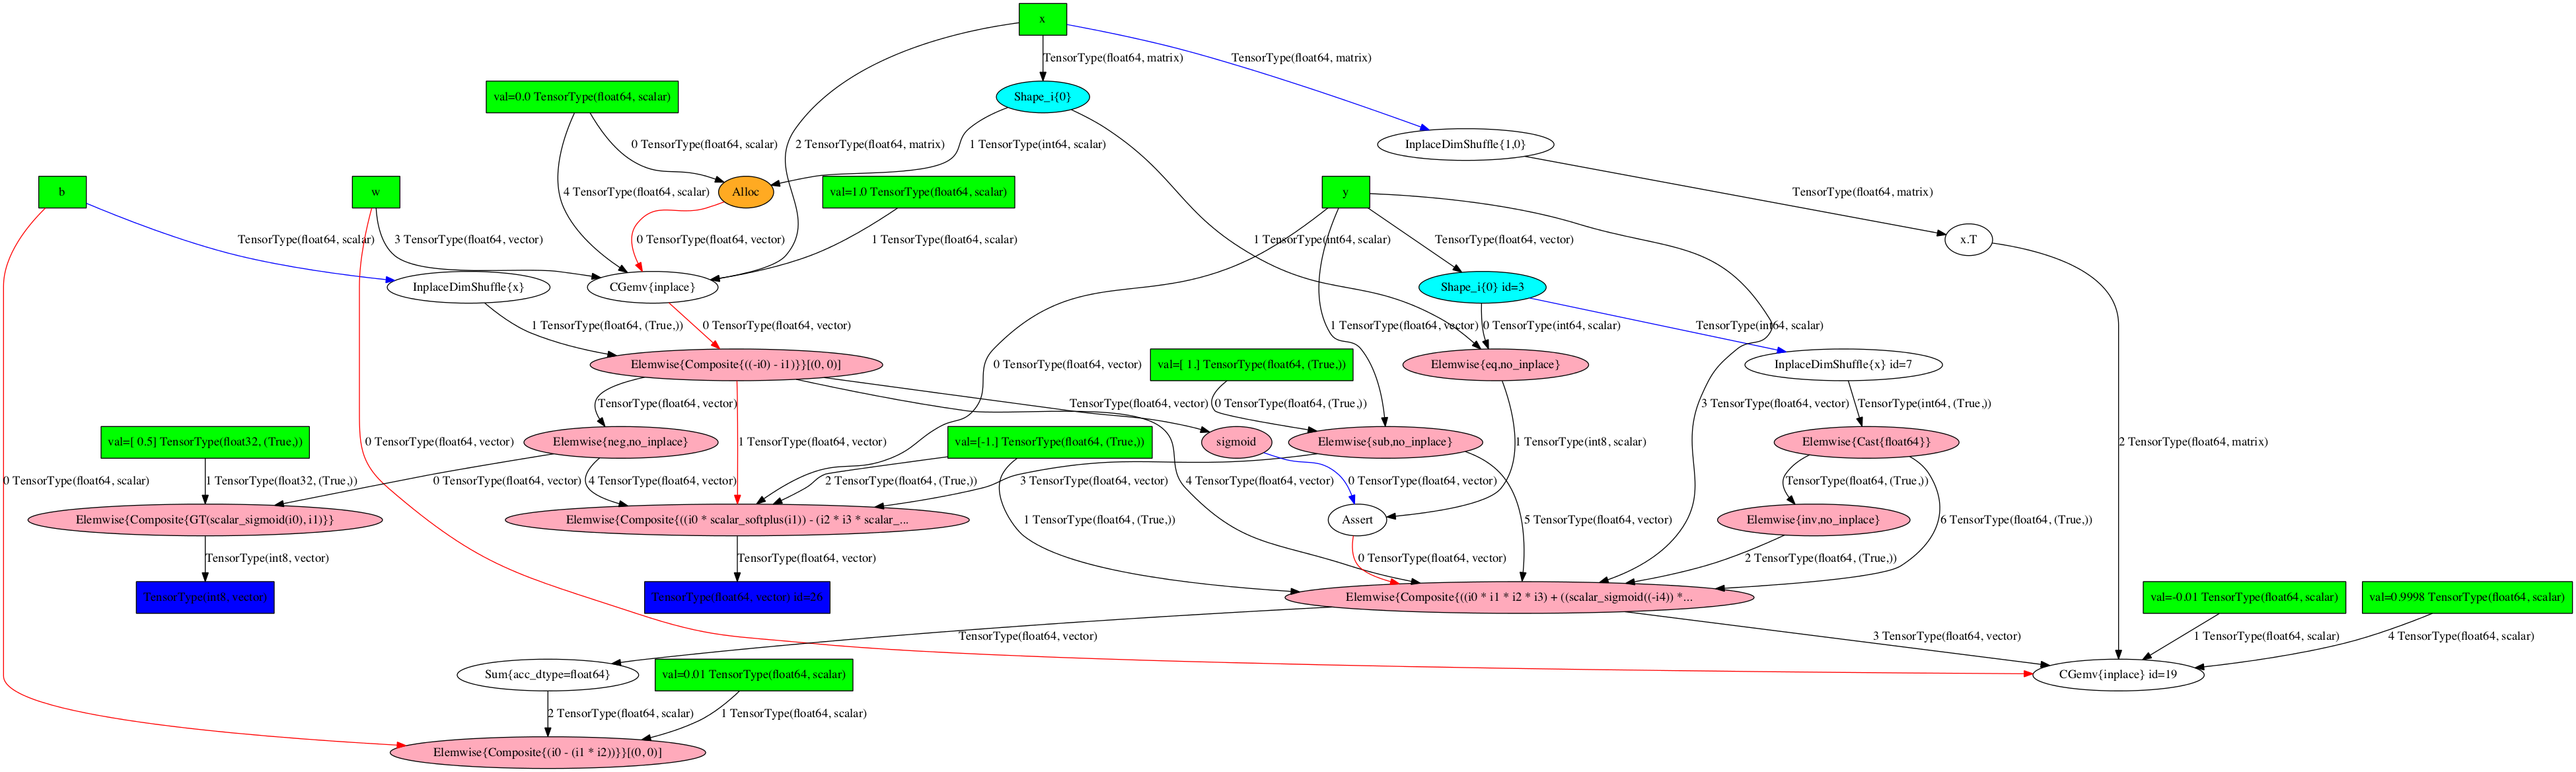
However, when the models get more and more complicated, the images also tend to get less informative:
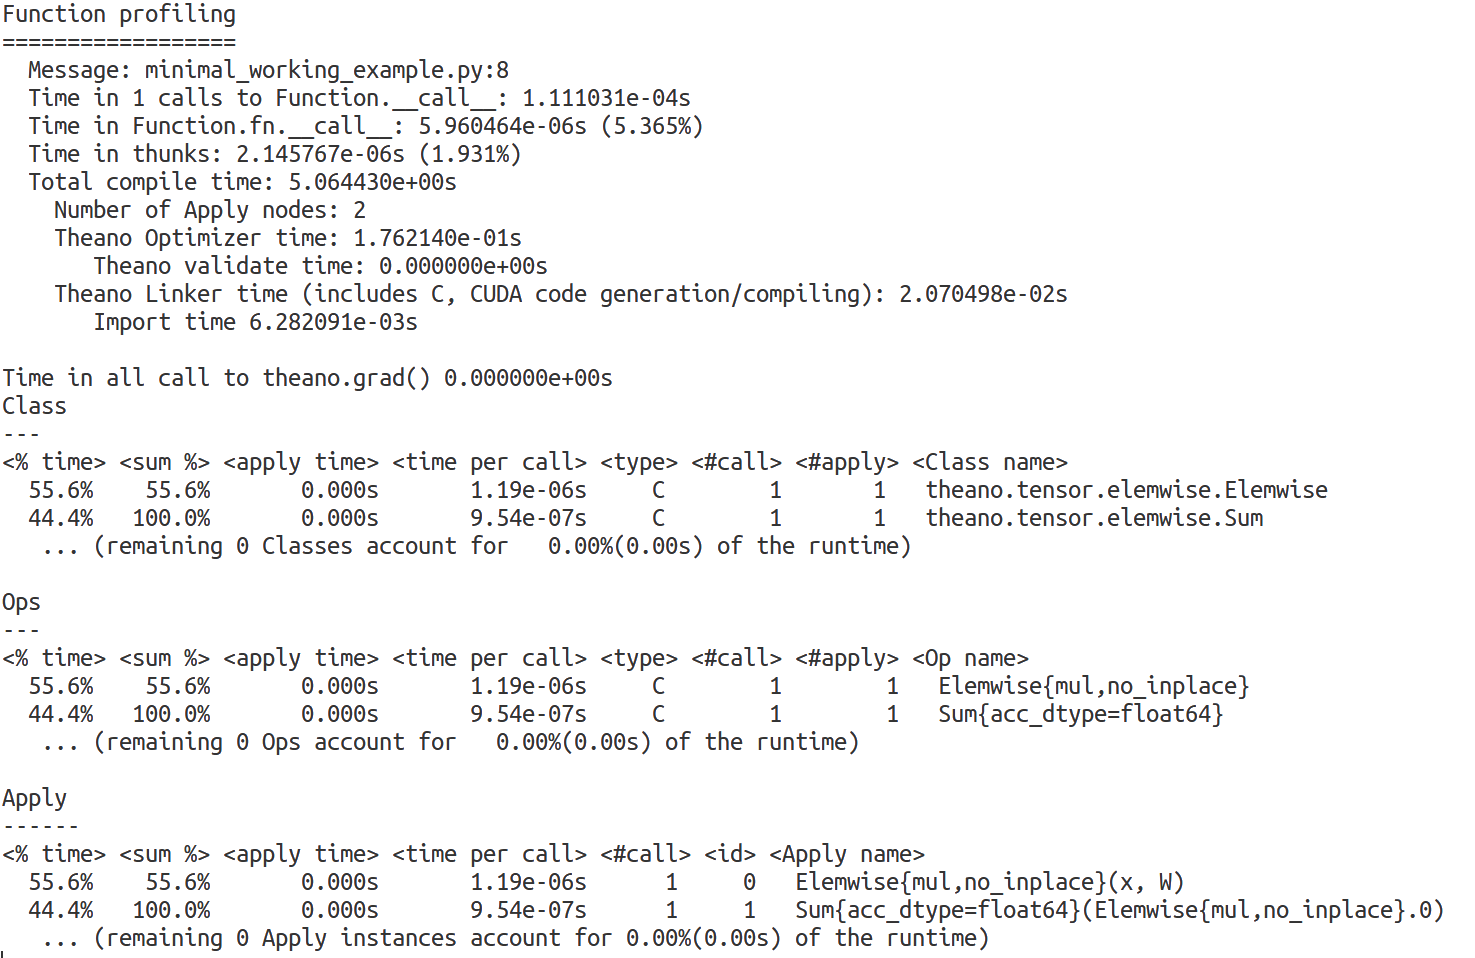
16. Profiling
Finally, Theano also provides a useful tool for analysing bottlenecks in your code. Just set profile=True in THEANO_FLAGS, and it will print information about how much time is spent on different operations in your code.
17. References
This concludes the Theano tutorial. If you haven’t yet had enough, take a look at the following links that I used for inspiration:Official Theano homepage and documentationOfficial Theano tutorialA Simple Tutorial on Theano by Jiang GuoCode samples for learning Theano by Alec Radford